
WooCommerce
Use the PayMongo Hosted Checkout Plugin for WooCommerce to accept cards, e-wallets, and direct online banking through PayMongo — all through a single plugin installation.
The PayMongo Hosted Checkout Plugin lets your WordPress store accept cards, e-wallets, and direct online banking through PayMongo — all from one plugin, one setup. Turn on the payment methods that fit your business, and let PayMongo handle the rest. This page covers prerequisites, installation, and configuration.
Migrating from the old WooCommerce plugin? We're moving all merchants to the Hosted Checkout Plugin — it supports the same ability to enable only specific payment methods at checkout, plus more methods and simpler setup. If you're still using the individual payment-method plugins, we recommend migrating soon, as that plugin will eventually stop receiving updates and support.
Uninstall the previous per-payment-method plugins first before setting up Hosted Checkout, to avoid conflicts. See the legacy plugin documentation for migration notes, or contact support if you need help.
Prerequisites
Before you begin the integration process, ensure you have:
- An activated PayMongo merchant account with access to your Live Public and Secret API Keys.
- An active WooCommerce store running on a WordPress website.
- WordPress version 5.0 or higher.
- WooCommerce version 3.9.3 or higher.
- A supported version of the PHP version 7.2.5 or higher.
- Your WooCommerce store currency set to Philippine Peso (PHP), as the plugin only supports payments in Philippine Peso.
Tip: You don't have to wait for account verification to start building. You can safely explore the plugin's workflows and test the overall checkout experience at any time by enabling Test Mode.
Understand the PayMongo Hosted Checkout Plugin
The PayMongo Hosted Checkout Plugin allows your online store to accept various payment methods directly, through a single integration.
- No coding required: the plugin enables integration without needing to write any code.
- Single plugin, all payment methods: manage every supported payment method from one settings screen, and choose which ones to expose at checkout.
- Supported payment methods:
- Cards: Visa, Mastercard (credit and debit)
- E-wallets: GCash, GrabPay, Maya, ShopeePay, Atome, BillEase
- Direct online banking: BPI, UnionBank, BDO (via Brankas), Landbank (via Brankas), Metrobank (via Brankas), RCBC (via Brankas)
- Google Pay
- QRPh
- Test and Live environments: switch between test and live environments to thoroughly test payment workflows before accepting actual payments.
Install the Hosted Checkout Plugin
You can find and install the plugin here in the WordPress.org plugin directory. If you're migrating from the old individual payment-method plugins, uninstall those first.
For Cynder's own step-by-step configuration guide (kept up to date on their end), see Configure the PayMongo WooCommerce Hosted Checkout Plugin.
Configure the Hosted Checkout Plugin
After installation, you need to configure the plugin to connect your PayMongo account and enable desired payment methods.
Connect your PayMongo account
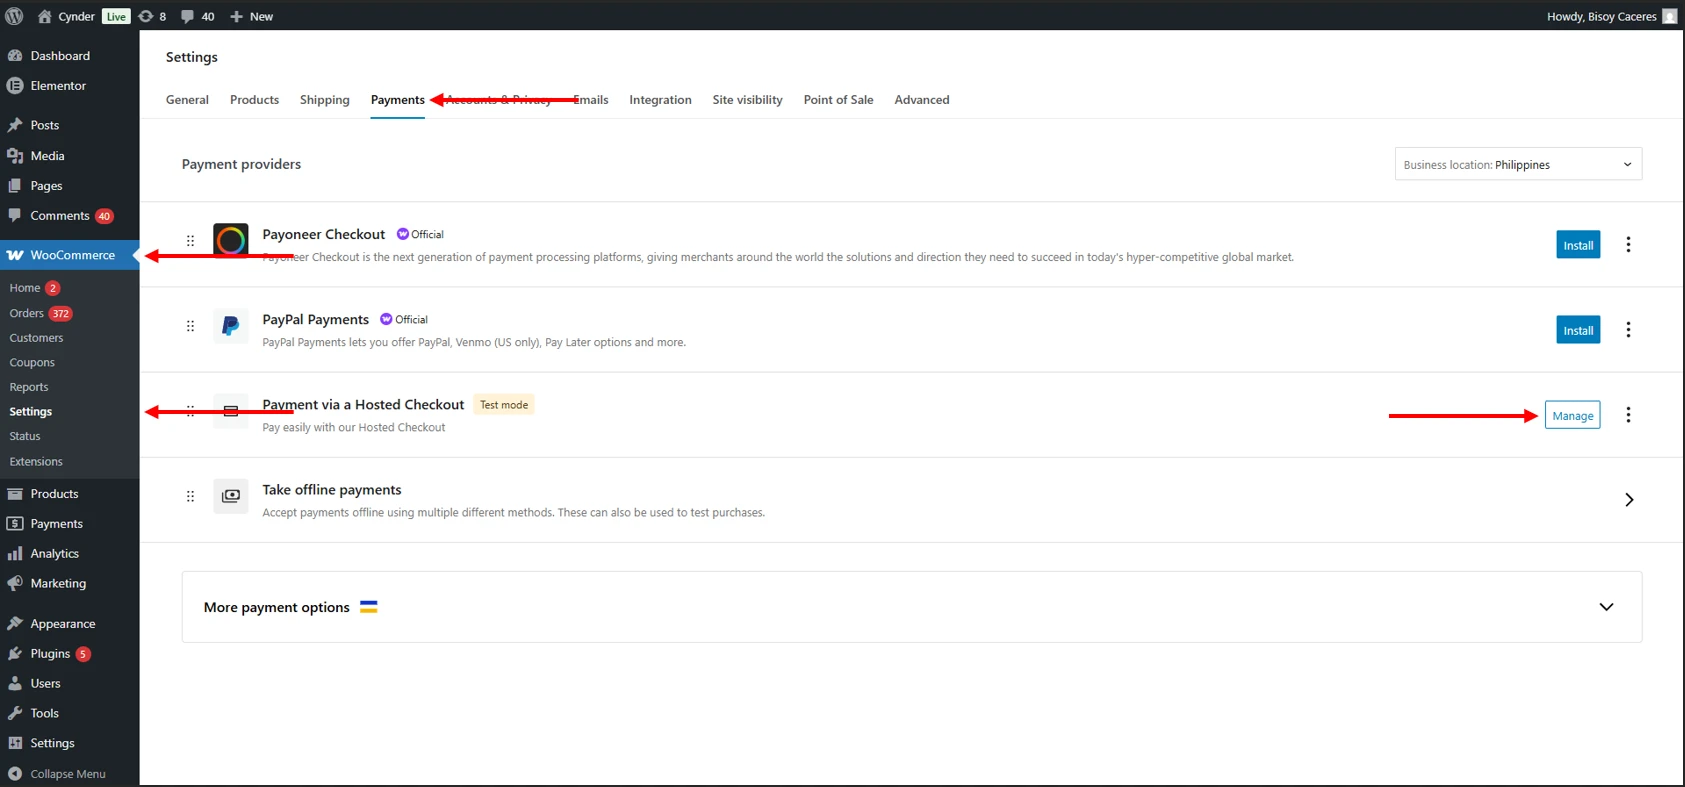
- In your WordPress dashboard, go to 'WooCommerce' > 'Settings'.
- Click on the 'Payments' tab.
- Look for 'Payment via a Hosted Checkout' and click 'Manage'.
- Check the boxes to enable the plugin, Test Mode, and Debug Mode.
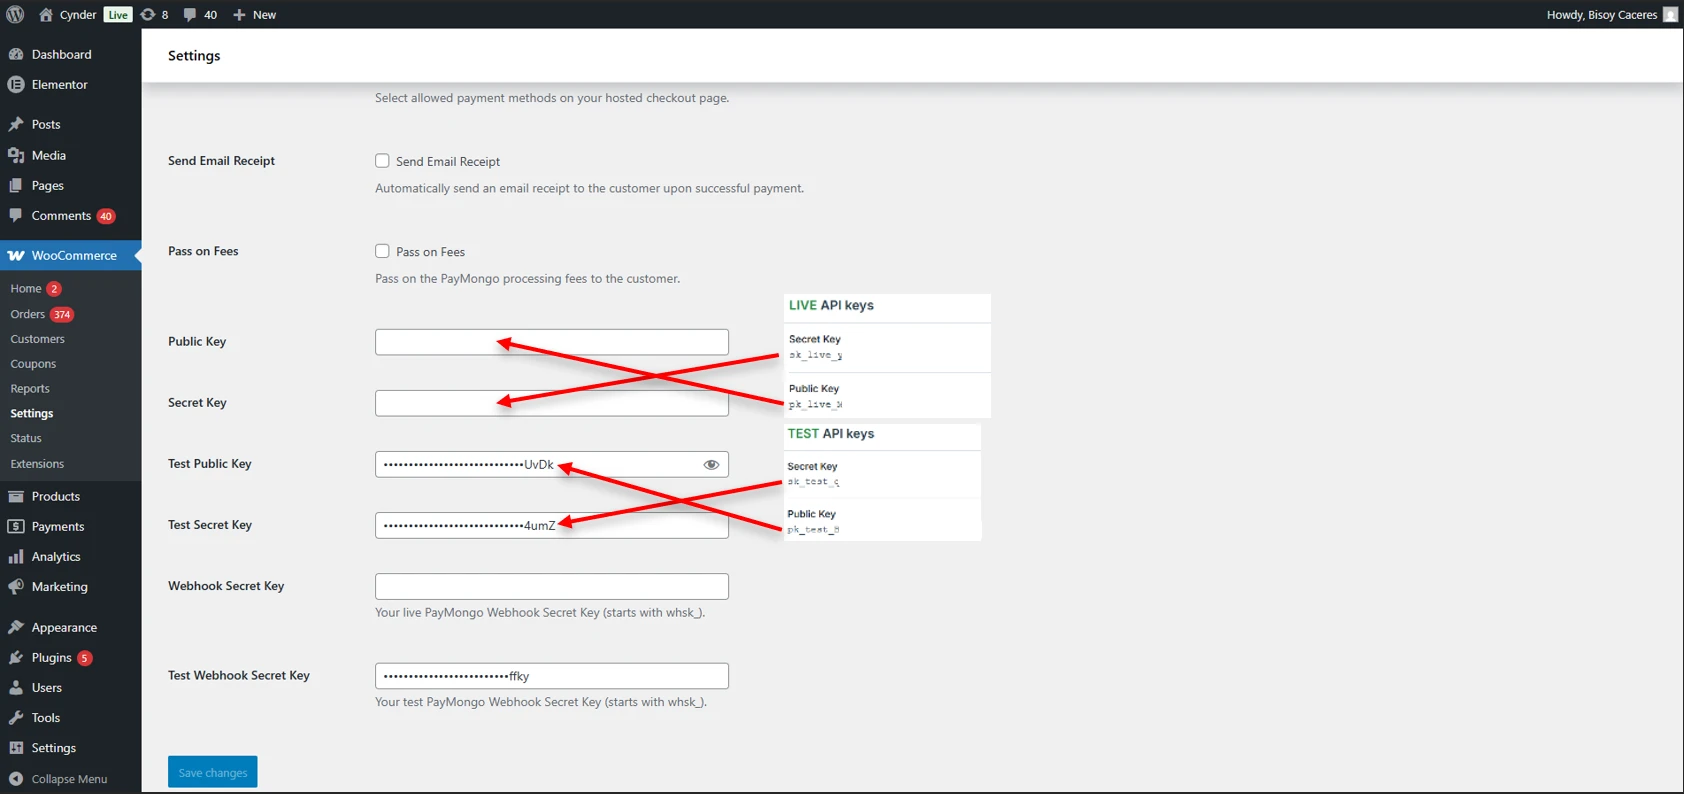
- You will need to enter your Live Public Key and Live Secret Key from your PayMongo Dashboard to connect your account. Test keys are also available if your account is still pending verification.
- Toggle between Test and Live Mode: the plugin allows you to switch between test and live environments for thorough testing before going live.
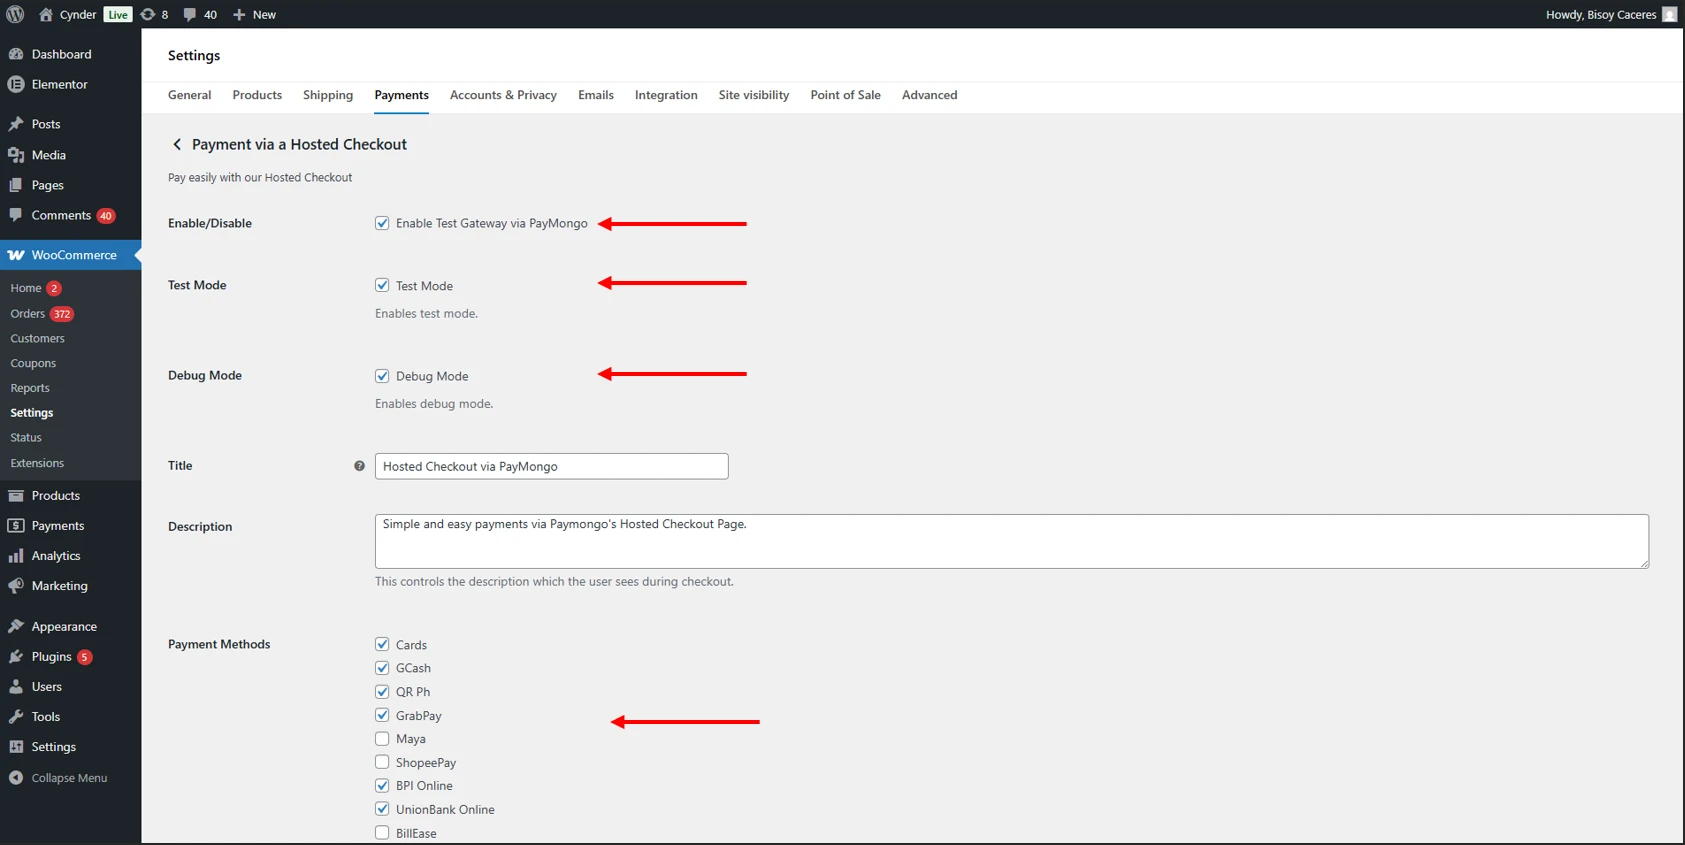
Note: API key configuration for the entire plugin — including all e-wallet methods like GCash, GrabPay, and Maya — is managed from this single section, even if you don't plan to offer card payments. Debug Mode must be turned off after testing to avoid exposing sensitive data in logs.
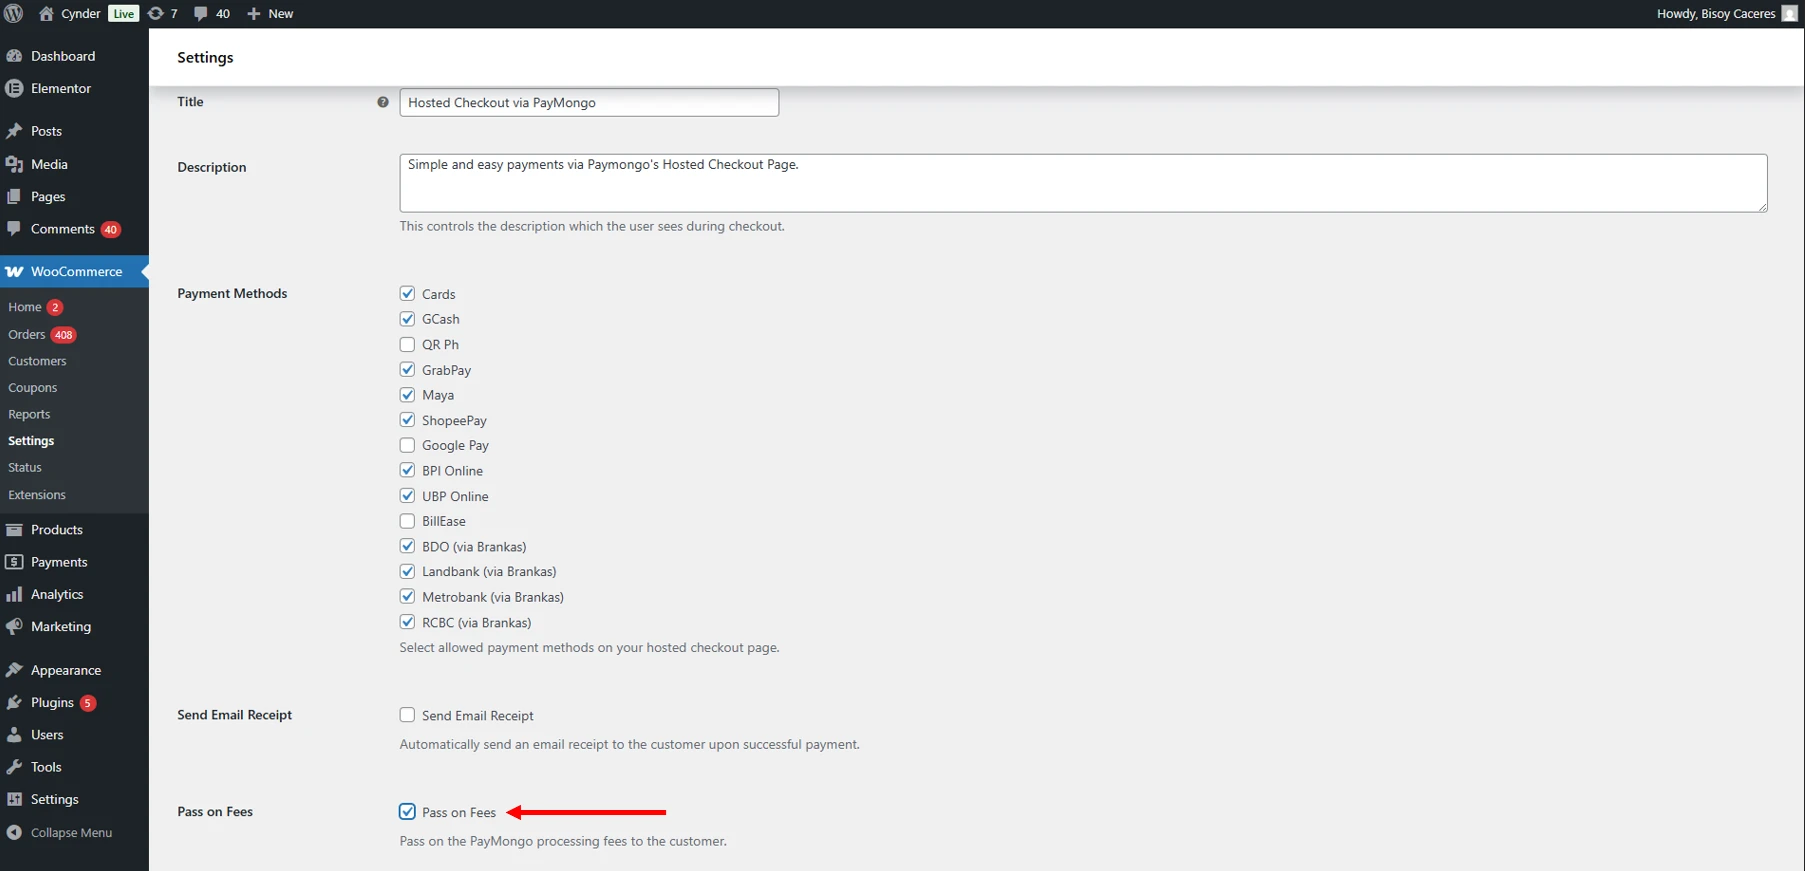
Configure payment methods
Within the plugin's settings, you can configure which specific payment methods are active:
- Cards: Enable credit/debit card payments (Visa and Mastercard).
- E-wallets: Enable GCash, GrabPay, Maya, ShopeePay, Atome, BillEase.
- Direct Online Banking: Enable BPI, UnionBank, and BDO, Landbank, Metrobank, RCBC (via Brankas).
- Google Pay
- QRPh
Ensure that the payment methods you want to offer are enabled in both your PayMongo Dashboard settings and the WooCommerce plugin settings. If a payment method doesn't appear, reach out to [email protected] for assistance.
Webhook configuration
For seamless processing of e-wallet payments, proper webhook configuration is essential.
- The plugin requires you to generate a Webhook Secret Key. You can generate one at https://paymongo-webhook-tool.cynder.io/. For a walkthrough of the tool itself, see Cynder's guide: How to generate a Webhook Secret.
- You will then need to paste this generated Webhook Secret Key into the designated field within your WooCommerce PayMongo plugin settings.
- This webhook enables PayMongo to send real-time notifications back to your WooCommerce store about payment statuses, ensuring your orders are updated correctly.
Fee handling
You can also toggle Pass on Fees on or off depending on your preference. When enabled, transaction fees are passed on to the customer at checkout instead of being absorbed by the merchant. This setting applies to all payment methods in the plugin — including GCash, GrabPay, Maya, and card payments. Click Save Changes once you're done.
Manage refunds for WooCommerce transactions
You can refund WooCommerce transactions processed via PayMongo, but the process involves both your PayMongo Dashboard and your WooCommerce Dashboard.
- Process Refund in PayMongo Dashboard:
- Log in to your PayMongo Dashboard.
- Go to the Payment Methods → Payments section.
- Search for the transaction using your WooCommerce Order Reference ID or the PayMongo Payment ID, then select it.
- Click the "Refund" button and follow the prompts to complete the refund.
- Manually Update Order Status in WooCommerce:
- After processing the refund in your PayMongo Dashboard, you must manually update the order status of that transaction in your WooCommerce Dashboard to reflect the refund. This ensures your records are synchronized.
Troubleshoot common issues
- Plugin compatibility: some WordPress themes or other plugins might cause conflicts. Try temporarily deactivating other plugins to isolate the issue.
- Transactions not going through: verify your API keys are correctly entered and that you're using Live keys for live transactions; ensure your account is fully activated; for e-wallet payments, double-check your Webhook Secret Key.
- Payment method not appearing: confirm the method is enabled in both your PayMongo Dashboard and the plugin settings, and clear any caching plugins.
Updated 23 days ago