
Storefront
Learn what the new PayMongo Storefront is, how Payment Pages and Online Stores differ, and how to create, customize, share, and manage a page or store from your dashboard.
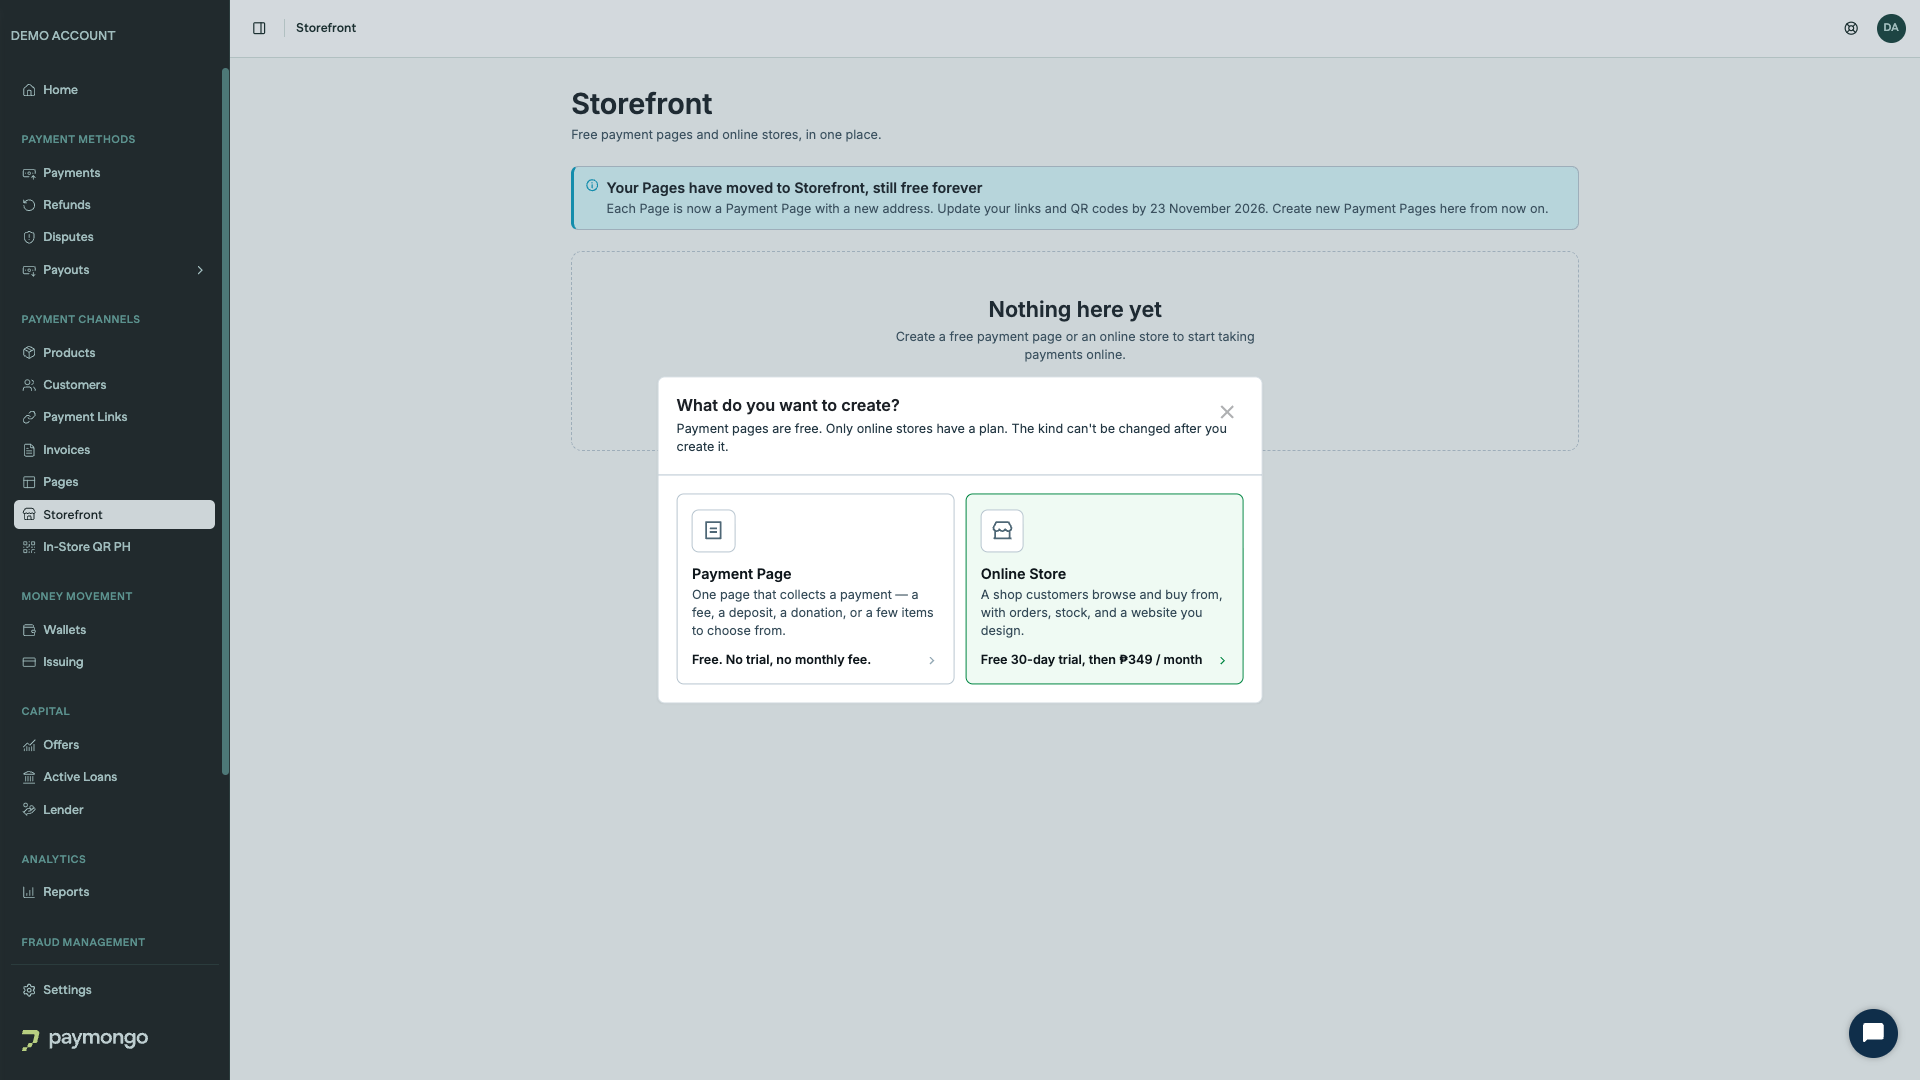
Use Storefront to sell online without building a website. From Payment Channels → Storefront in your PayMongo Dashboard you can create two kinds of storefront:
- A Payment Page: one hosted page that collects a payment. It is free, forever.
- An Online Store: a full shop your customers browse and buy from, with a website editor, order management, and inventory management. It comes with a one-month free trial and then runs on a subscription.
Both take payments through PayMongo's hosted checkout, so your customers pay with the payment methods already active on your account, and every payment appears in your dashboard in real time.
Pages have moved to Storefront, still free foreverPayment Pages used to live under Payment Channels → Payment Pages. They are now Payment Pages inside Storefront. Every feature is the same, and Payment Pages stay free. See Moving from Pages to Storefront for what changes for your existing pages.
What's new
The previous Storefront generated a site from a text prompt. The new Storefront gives you direct control over your shop and adds the tools to run it:
| Payment Page | Online Store | |
|---|---|---|
| Price | Free. No trial, no monthly fee. | Free 30-day trial, then a monthly subscription |
| Best for | A fee, a deposit, a donation, or a few items to choose from | A catalog customers browse, add to a cart, and check out |
| Website editor | — | ✓ Theme, header, footer, home page sections, custom pages |
| Order management | — | ✓ Orders, statuses, fulfillment, cancel |
| Inventory management | — | ✓ Stock counts per product and variant, low-stock and sold-out tracking |
| Cart | — | ✓ Optional. Turn it off for buy-now-only stores. |
| Delivery and pickup | — | ✓ Your own delivery with a flat fee, or customer pickup |
| Custom questions before payment | ✓ | — |
| Payments list | ✓ | ✓ (through Orders) |
| Public address | storefront.paymongo.com/your-page | storefront.paymongo.com/your-store |
You choose the kind when you create a storefront. The kind can't be changed afterwards, so create a new storefront if you need the other kind.
Payment Pages
A Payment Page is a single page with your title, description, and cover image, followed by a payment form. It is the same product as the former Pages, now inside Storefront.
Use a Payment Page when you want one permanent link or QR code you can share again and again, and you don't need a catalog, a cart, or order tracking.
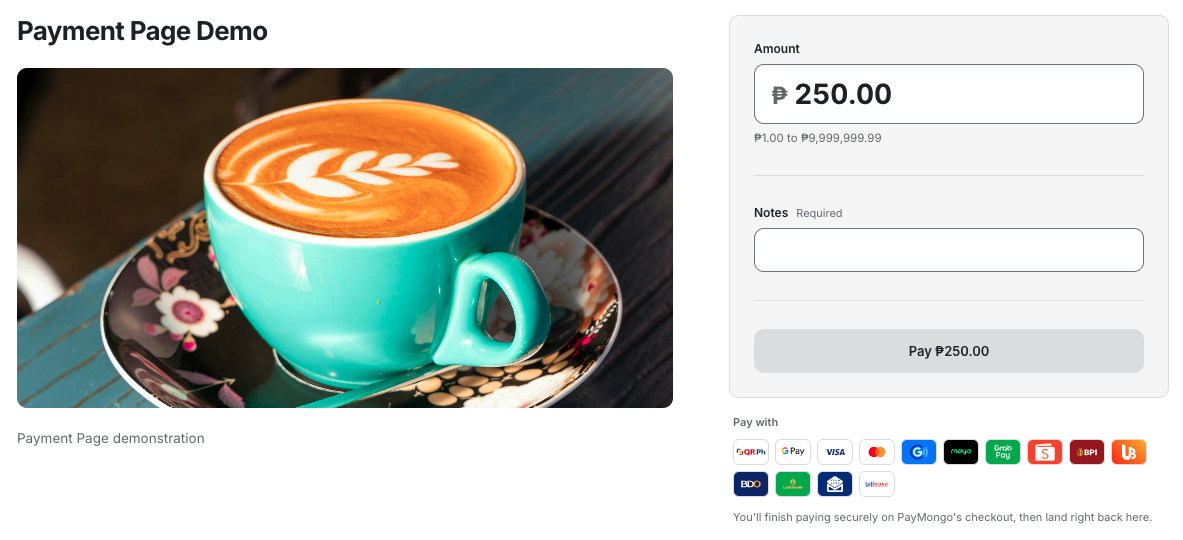
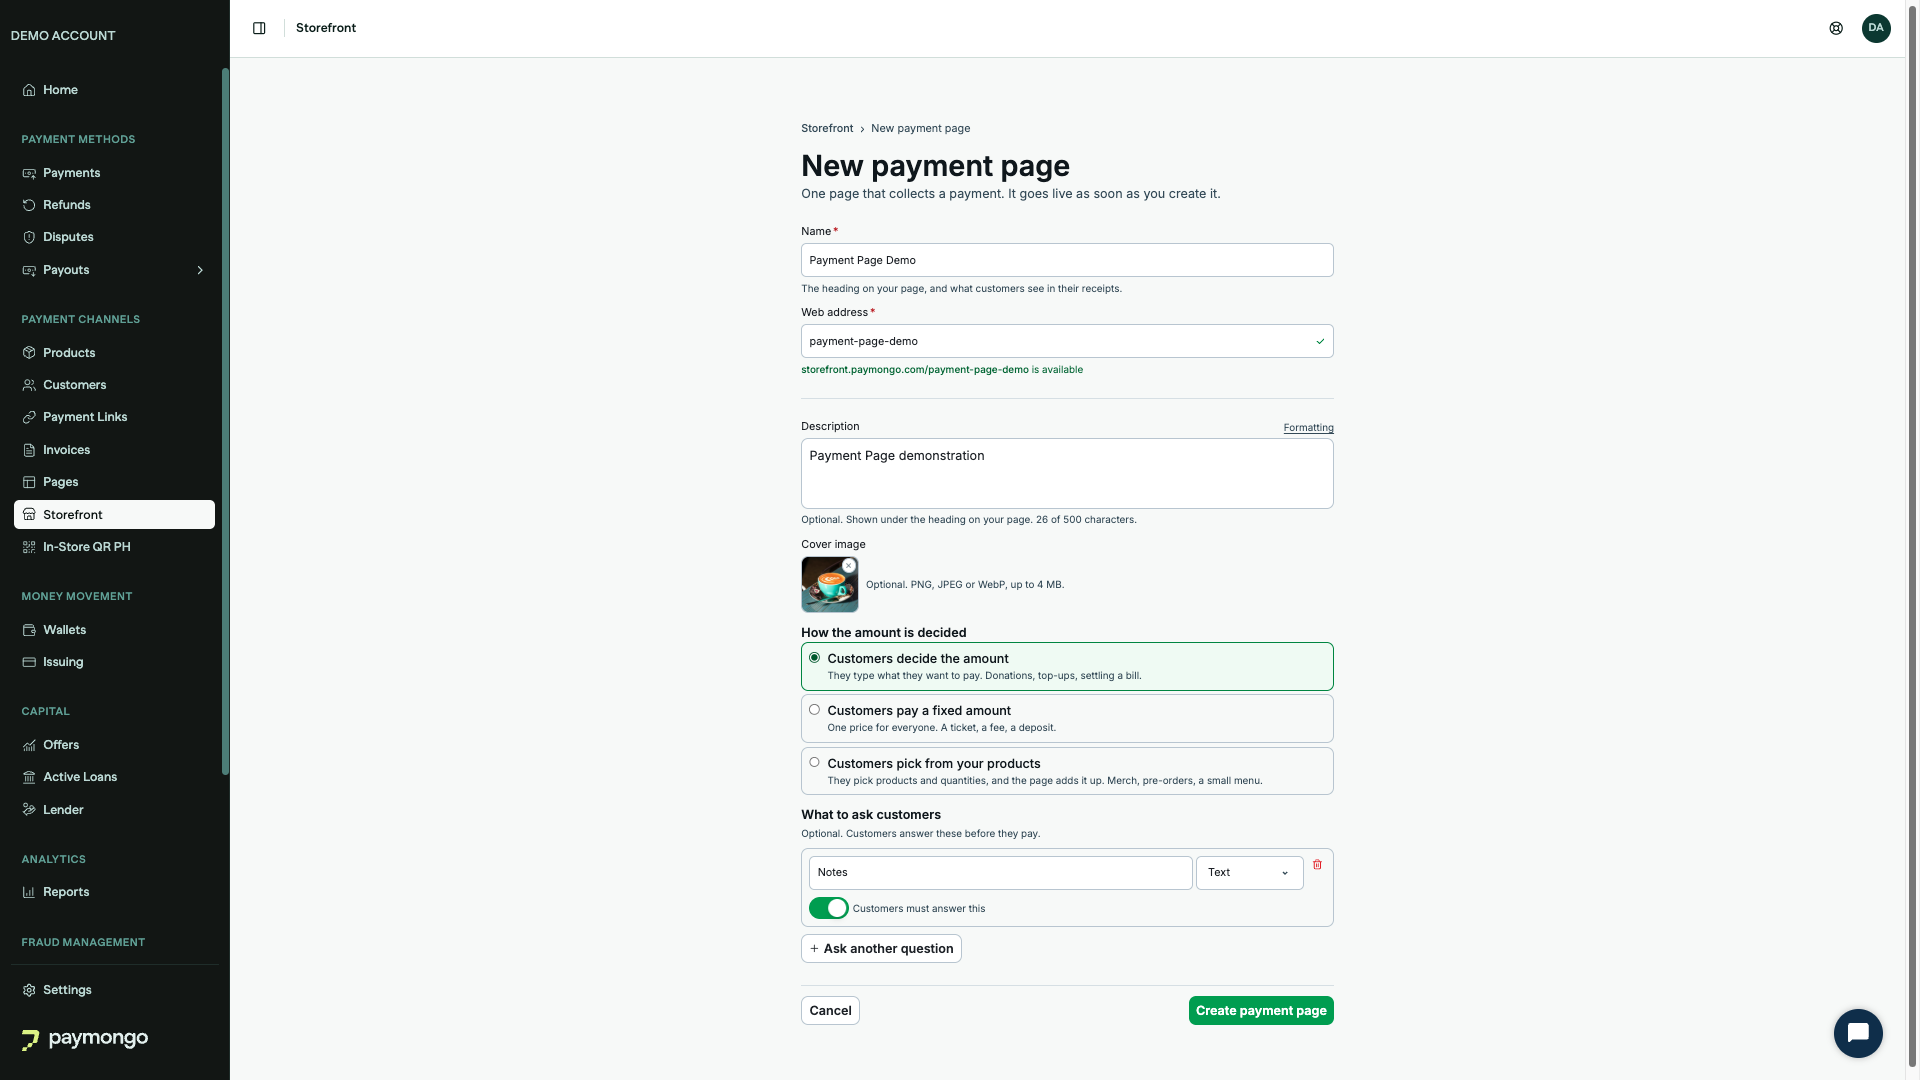
You decide how the amount is set:
- Customers decide the amount: for donations, top-ups, or settling a bill. You can set a minimum and a maximum.
- Customers pay a fixed amount: for a ticket, a fee, or a deposit.
- Customers pick from your products: for merch, pre-orders, or a small menu. Customers choose items and quantities, and the page totals them.
You can also add questions customers answer before paying, such as a name, an order number, or a size. Each question can be text, a number, or a single choice from a list, and you can mark it as required. Answers are saved with the payment and appear as columns in the page's Payments tab.
Changes to a Payment Page go live the moment you save them. The page does not ask for the payer's name, email, or mobile number. PayMongo's hosted checkout collects those on the next screen, so add a question if you need anything else from the payer.
See the details of a payment
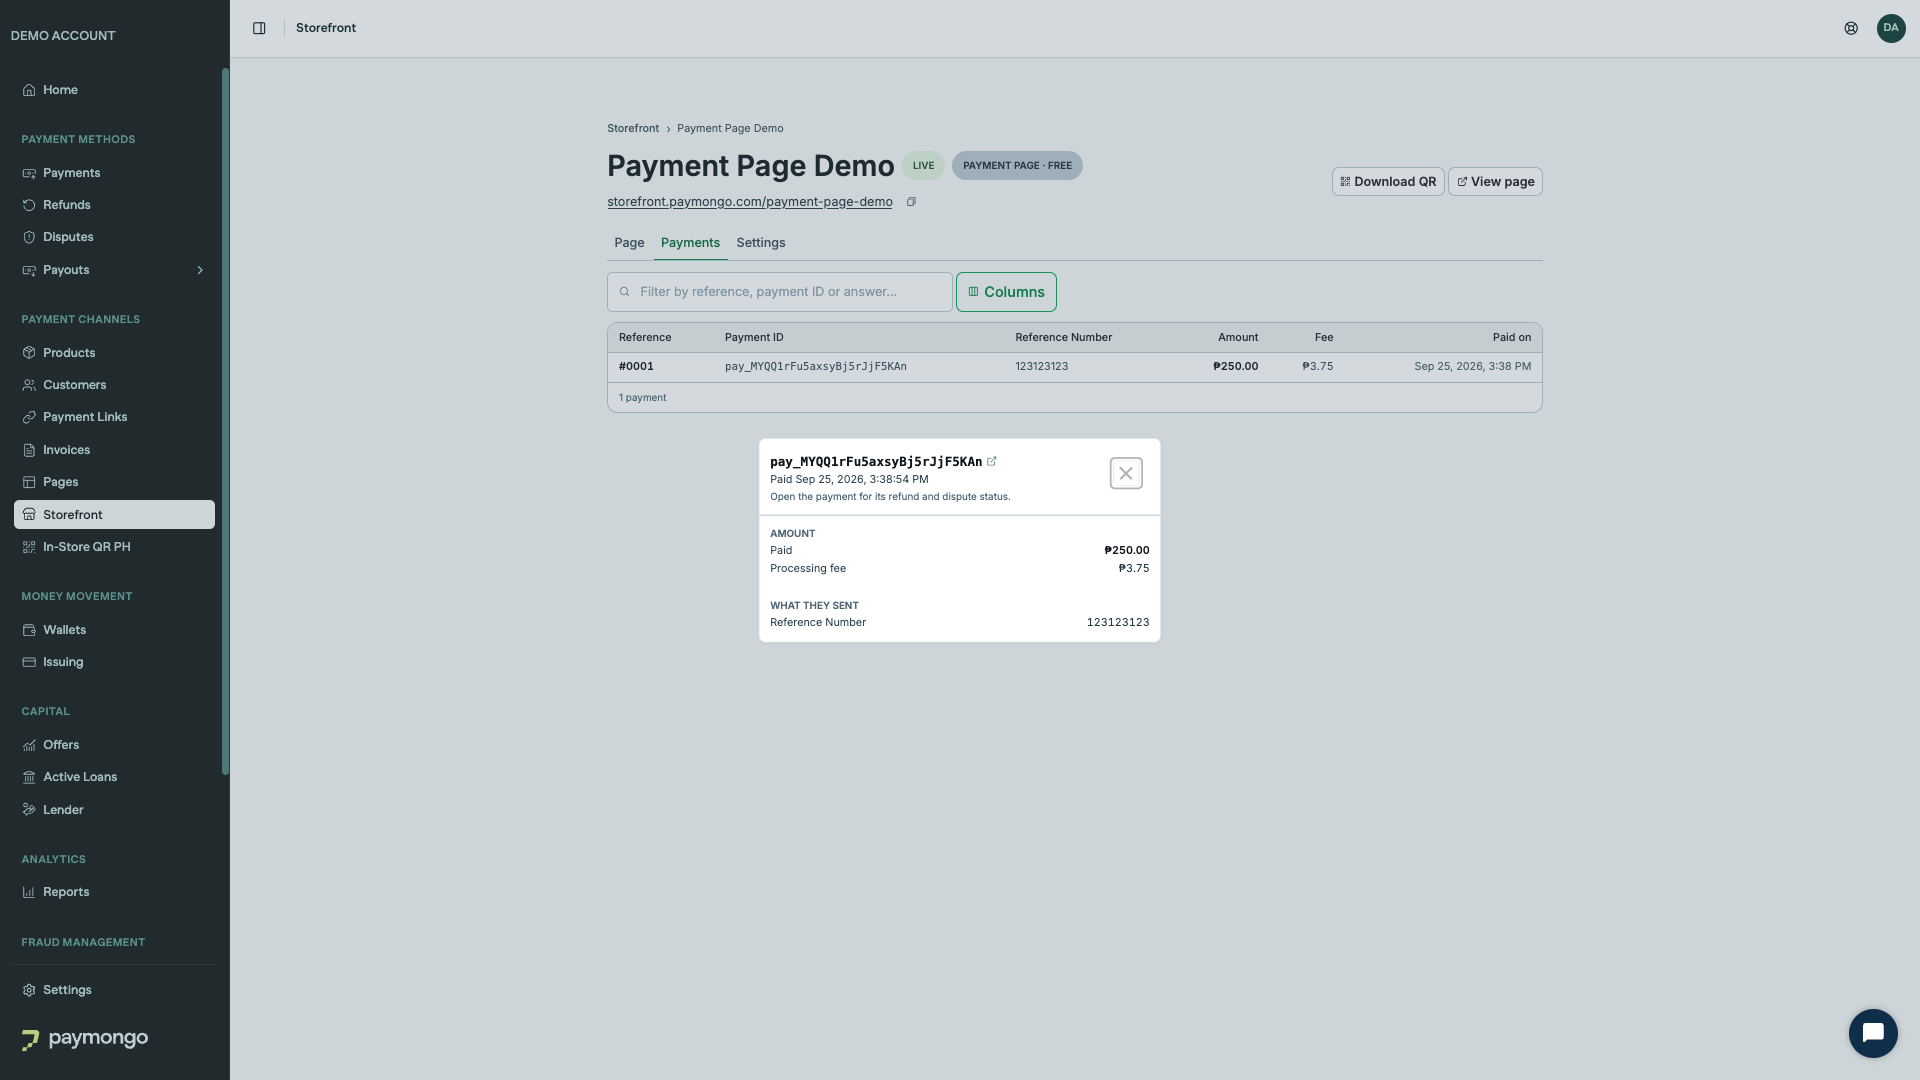
Open the page's Payments tab to see every payment made through the page. Each row shows the reference, the payment ID, the customer's answers to your questions, the amount, the fee, and the paid time.
- Find a payment. Type in the filter box to search by reference, payment ID, or an answer to one of your questions.
- Choose your columns. Click Columns to show or hide columns, including one column per question.
- Open the details. Click a row to open the payment's details:
- Amount: what the customer paid and the processing fee.
- What they sent: the customer's answers to your questions.
- Go to the full payment. Click the payment ID to open the payment under Payments → All Payments, where you can see its refund and dispute status, issue a refund, or download the receipt.
Online Store
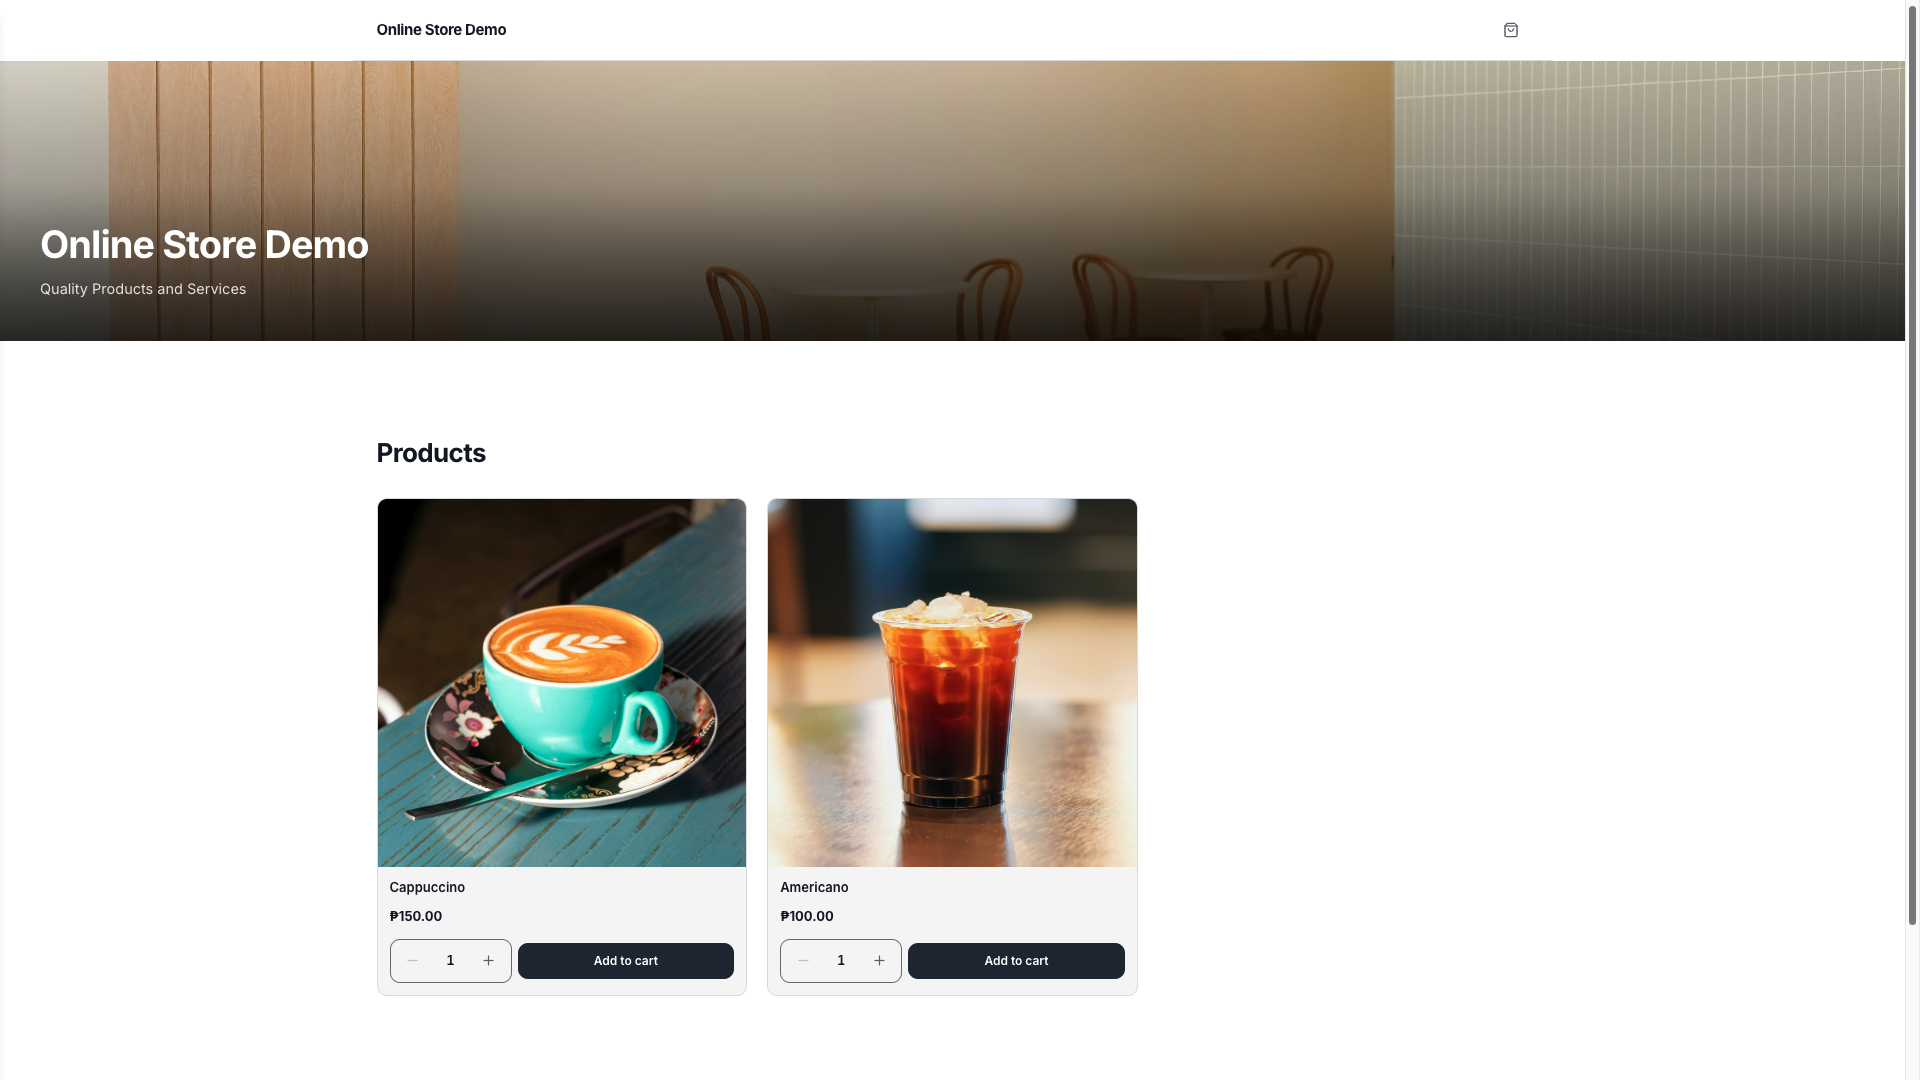
An Online Store is a shop with a home page, a product catalog, product pages, a cart, and a checkout. Customers browse, add items, choose delivery or pickup, and pay on PayMongo's hosted checkout. After payment they return to your store and see an order confirmation, and they receive an email receipt.
Website editor
Design your store in the dashboard and see the result in a live preview, on desktop and mobile.
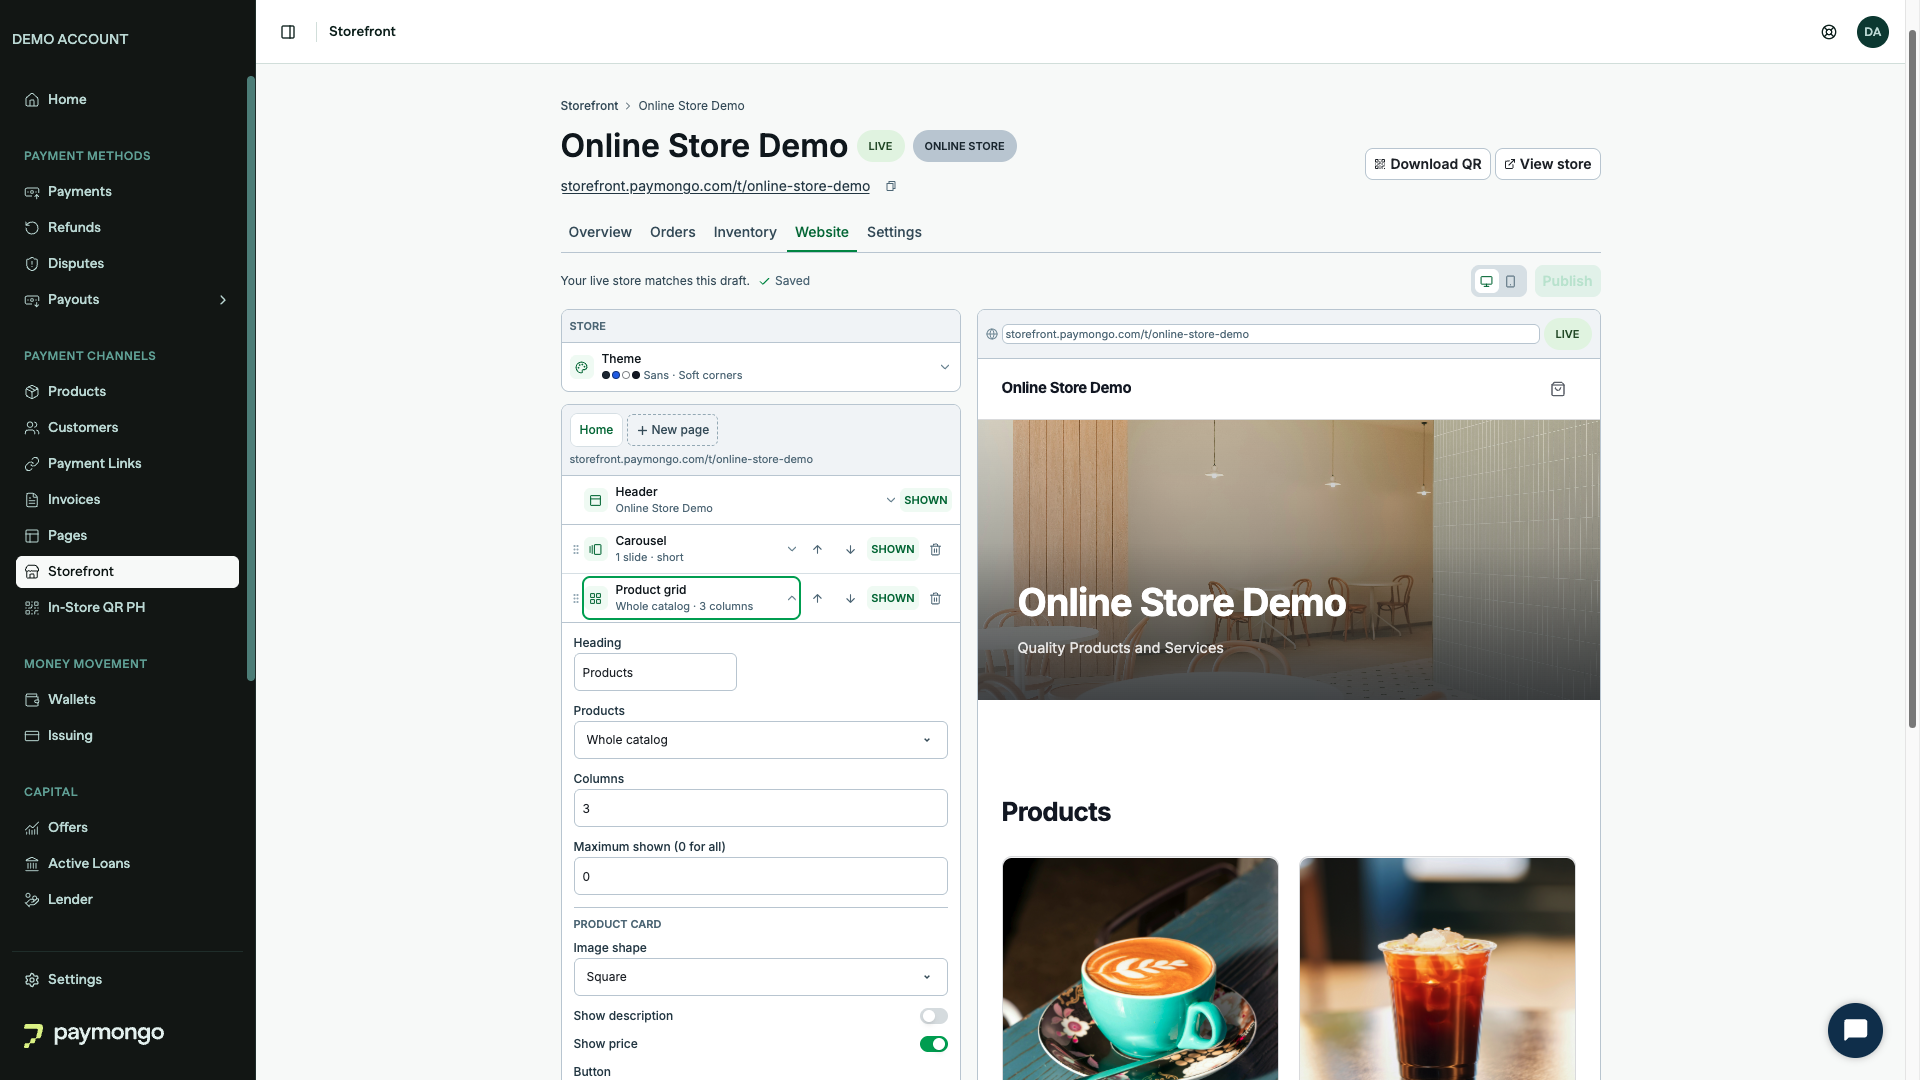
- Theme: brand color, accent color, page background, text color, a sans-serif or serif typeface, and square, soft, or round corners. Text on colored buttons stays readable automatically.
- Header: logo image or store name, menu links, an announcement bar, an optional search icon, and a sticky header.
- Footer: about text, links, social links, your accepted payment methods, and a copyright line.
- Home page sections: a carousel or hero banner with slides and buttons, an image-and-text content block, a product grid showing your whole catalog or chosen products, and a product detail block. Reorder, hide, or delete sections as you like.
- Custom pages: add pages such as About or FAQ. They are served at
/pages/your-pageand are added to your menus automatically.
The catalog, product, cart, and checkout pages use built-in layouts that follow your theme, so they always work.
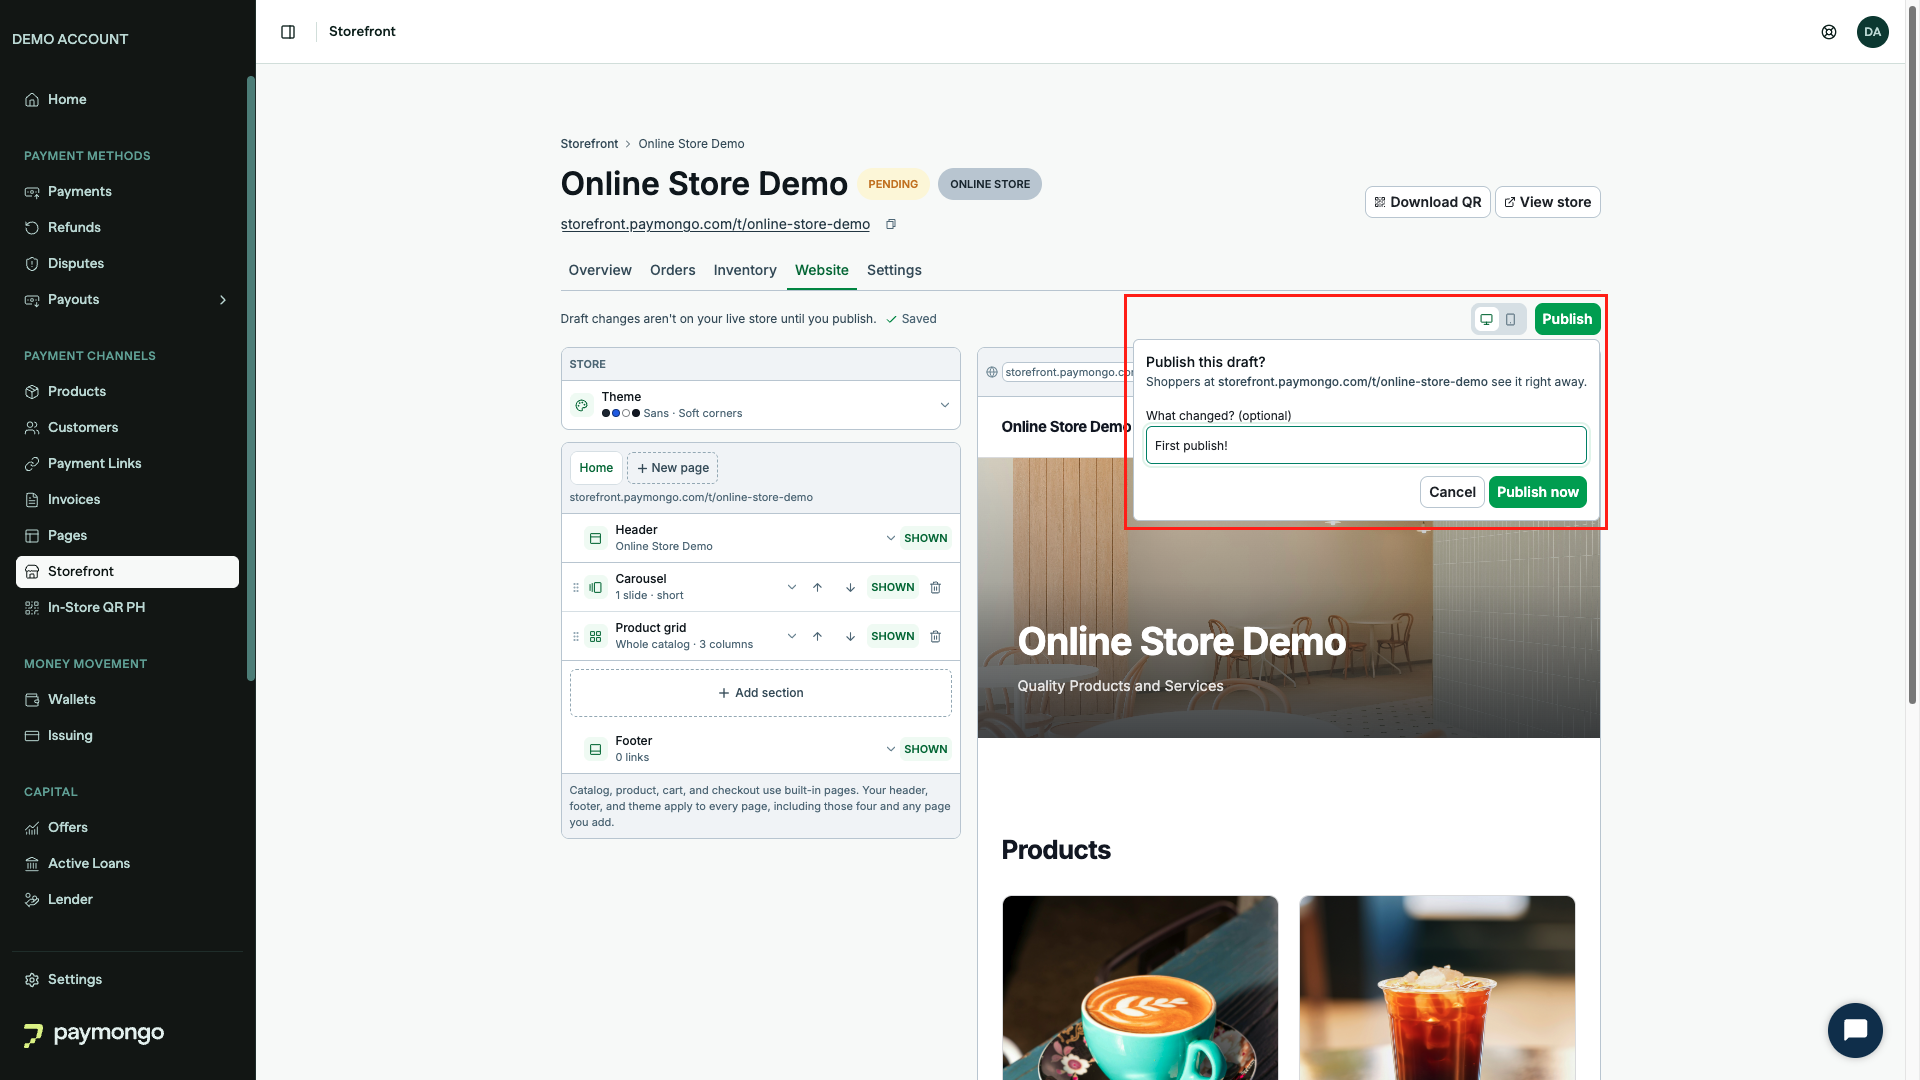
Edits save to a draft automatically. Your live store doesn't change until you click Publish. If a section is unfinished, the editor lists every problem and nothing is published until you fix or hide it. Every publish is kept, so you can roll back to an earlier version.
Products and inventory
Your store sells products from your dashboard's Products area. Put products on the store's shelf, and set which ones are available to buy.
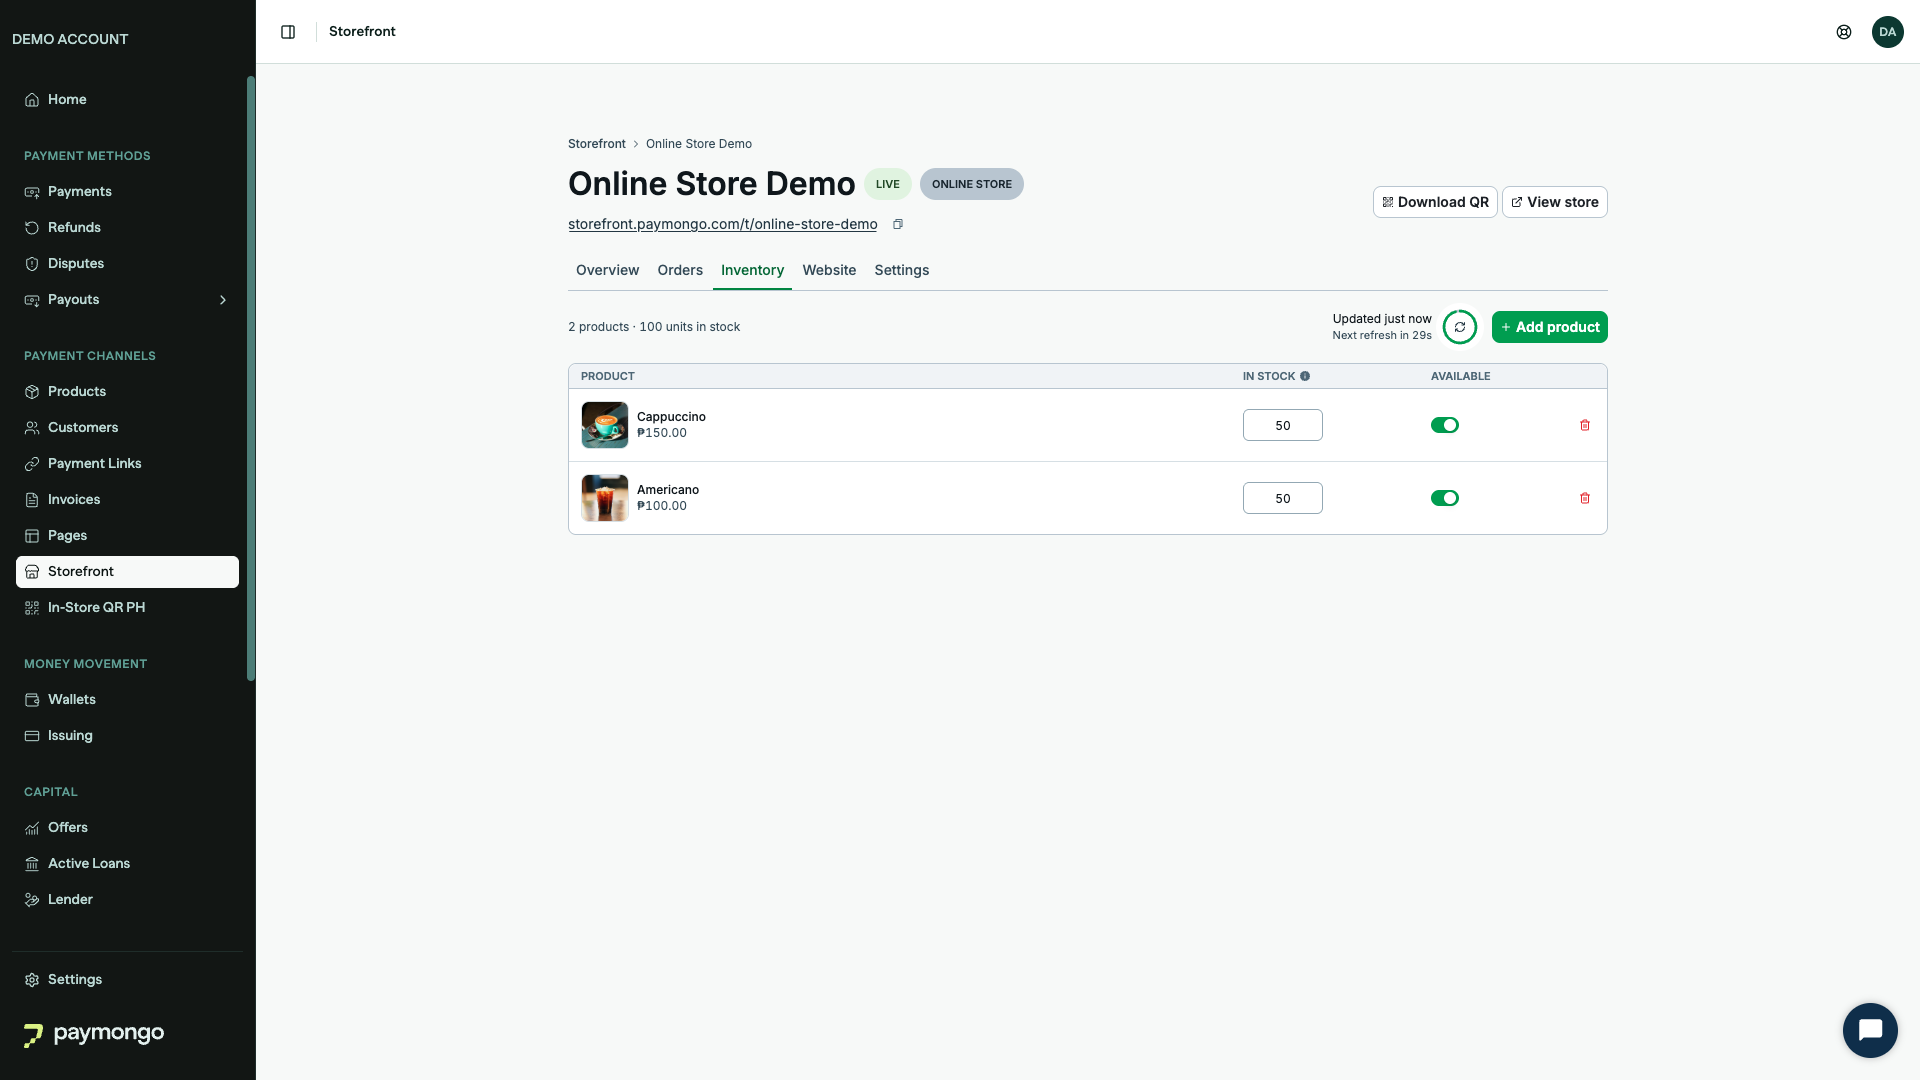
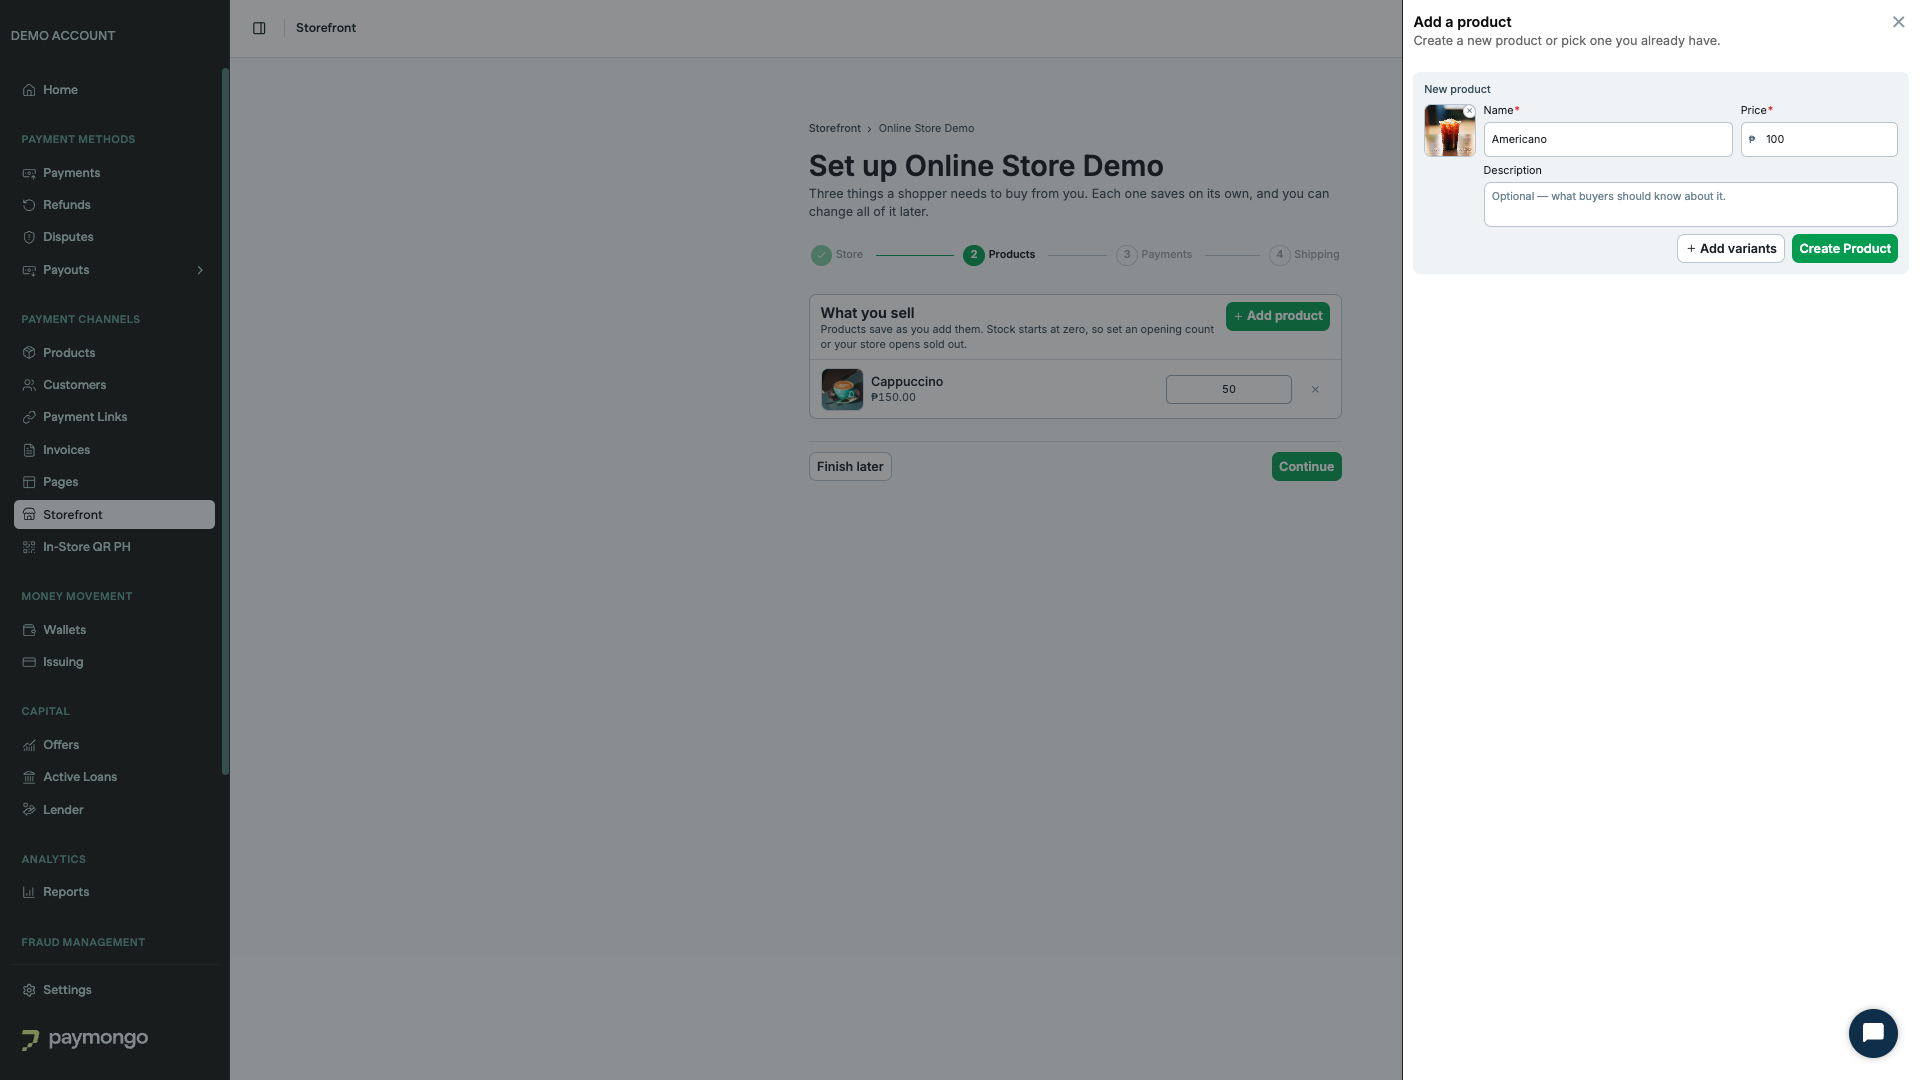
- Create products with a name, price, description, image, and optional variants such as size or color, each with its own price.
- Set a stock count per product and variant. Stock starts at zero, so set an opening count or your store opens sold out.
- Track stock across your warehouses. Your store sells the combined stock of all its warehouses.
- Units reserved by open orders show as on hold so you don't oversell.
- Customers see "Only a few left" and "Sold out" states on product cards, product pages, the cart, and checkout. A sold-out item can't be checked out.
Order management
Every paid order appears in your store's Orders tab and on the store overview, which shows what was paid today, what's waiting to be fulfilled, and what needs stock.
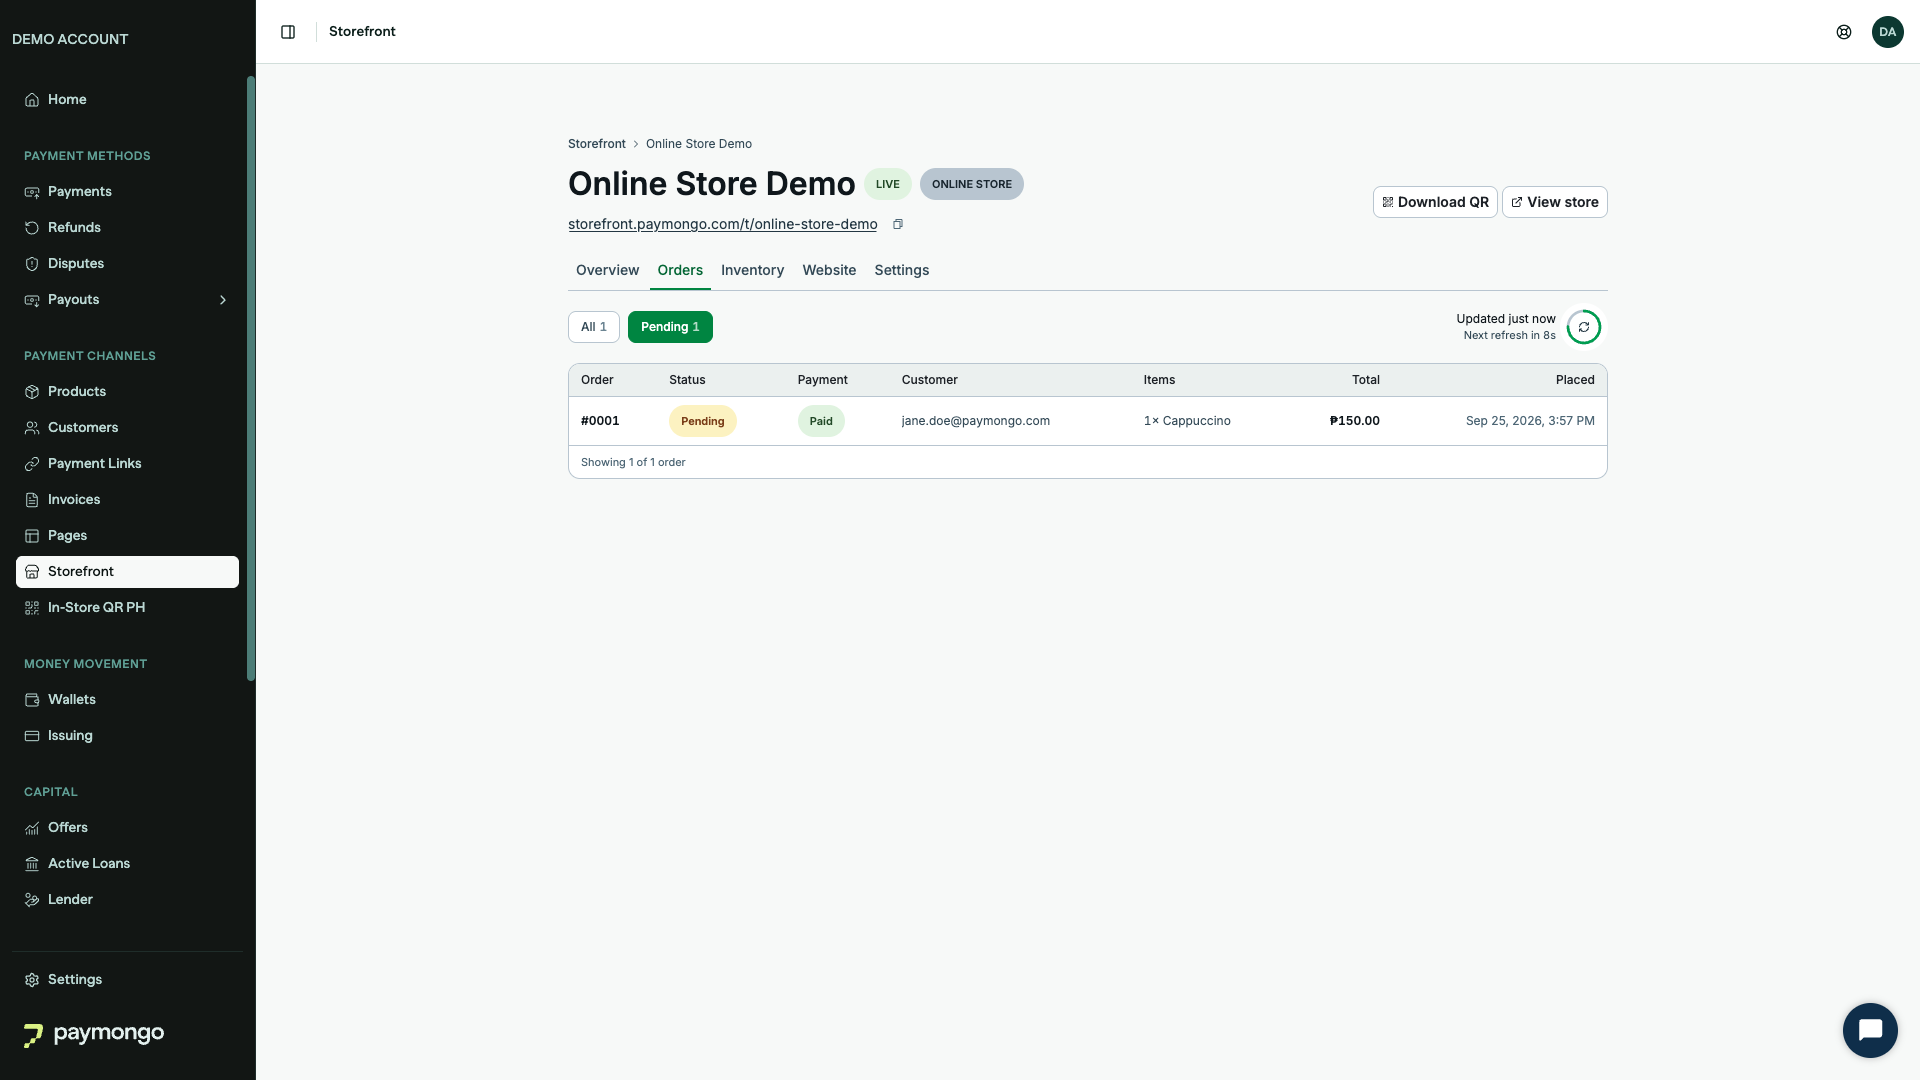
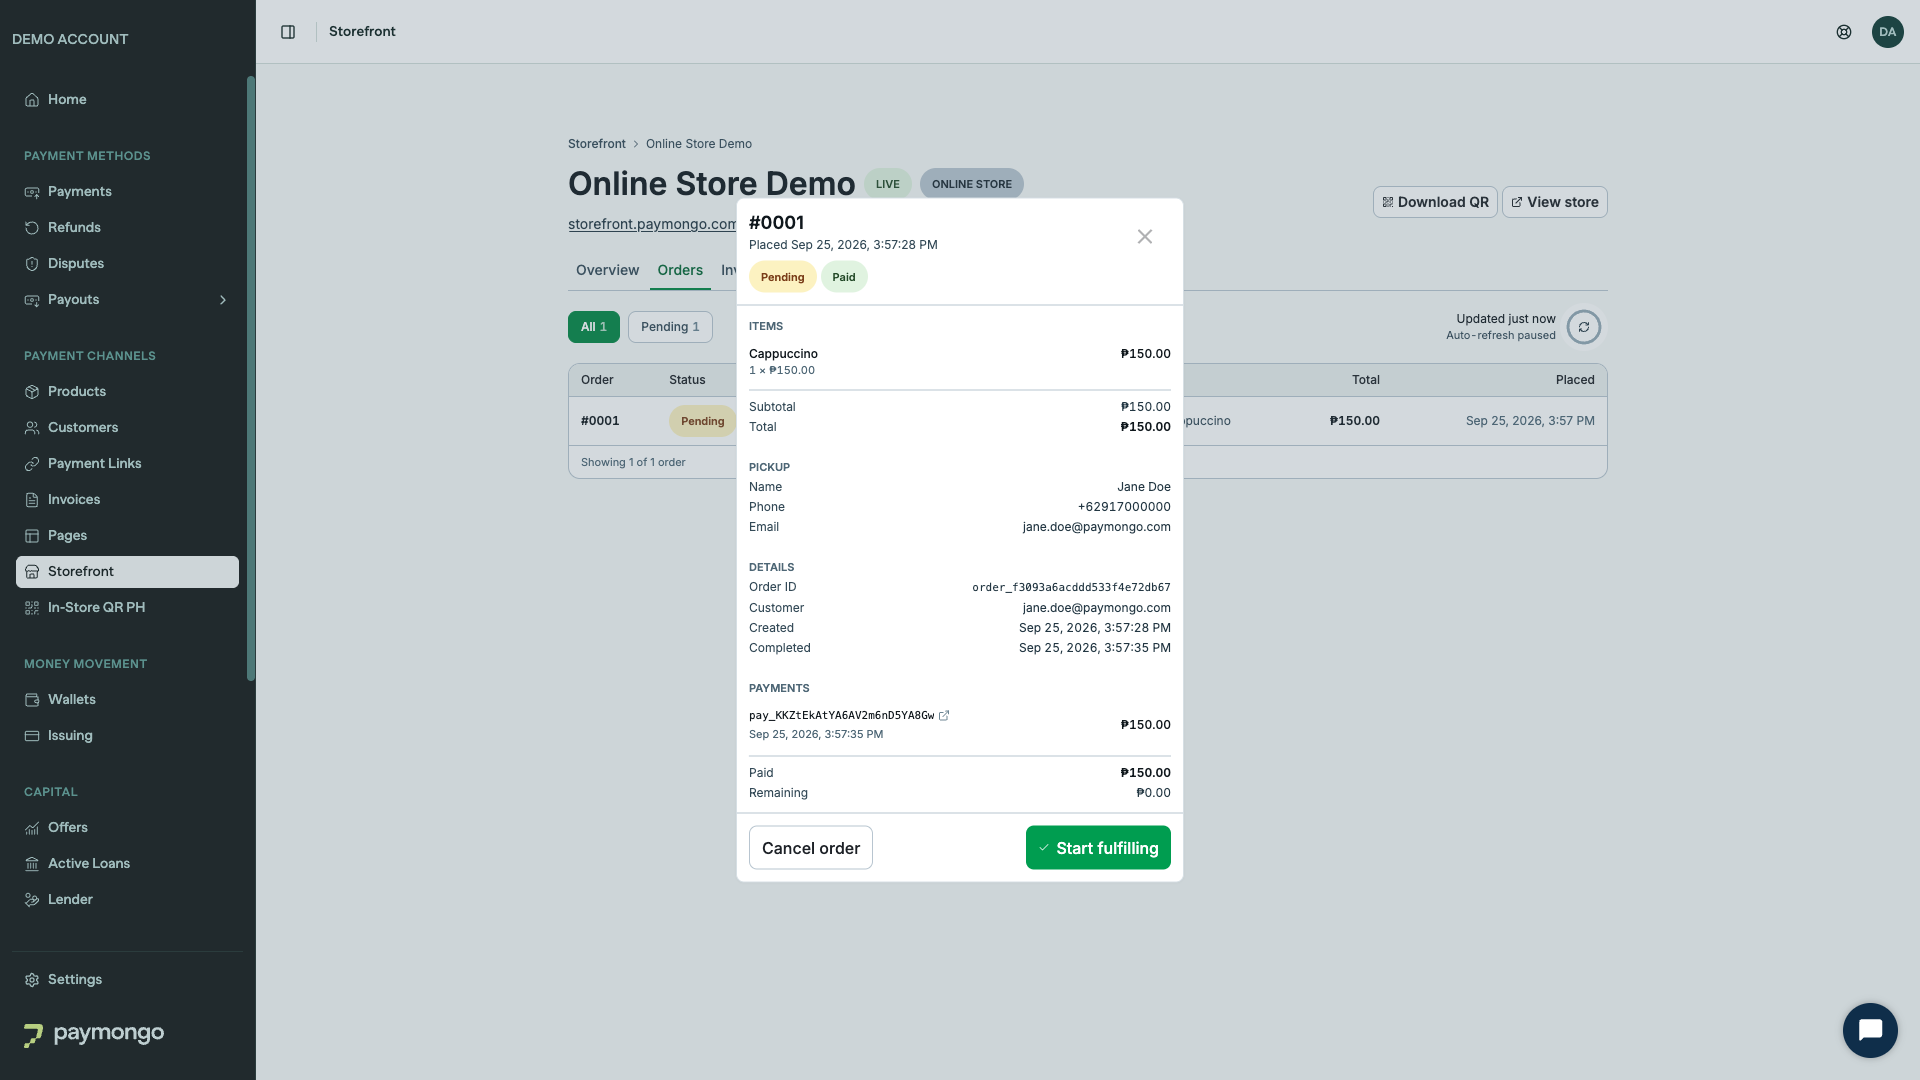
Orders move through Pending → In progress → Fulfilled → Completed, one step at a time, and you can Cancel an order at any stage. Each order shows the items, subtotal, fees, and total, the customer's name, email, and mobile number, the delivery address or pickup choice, and links to the payments in your dashboard.
Payments, delivery, and pickup
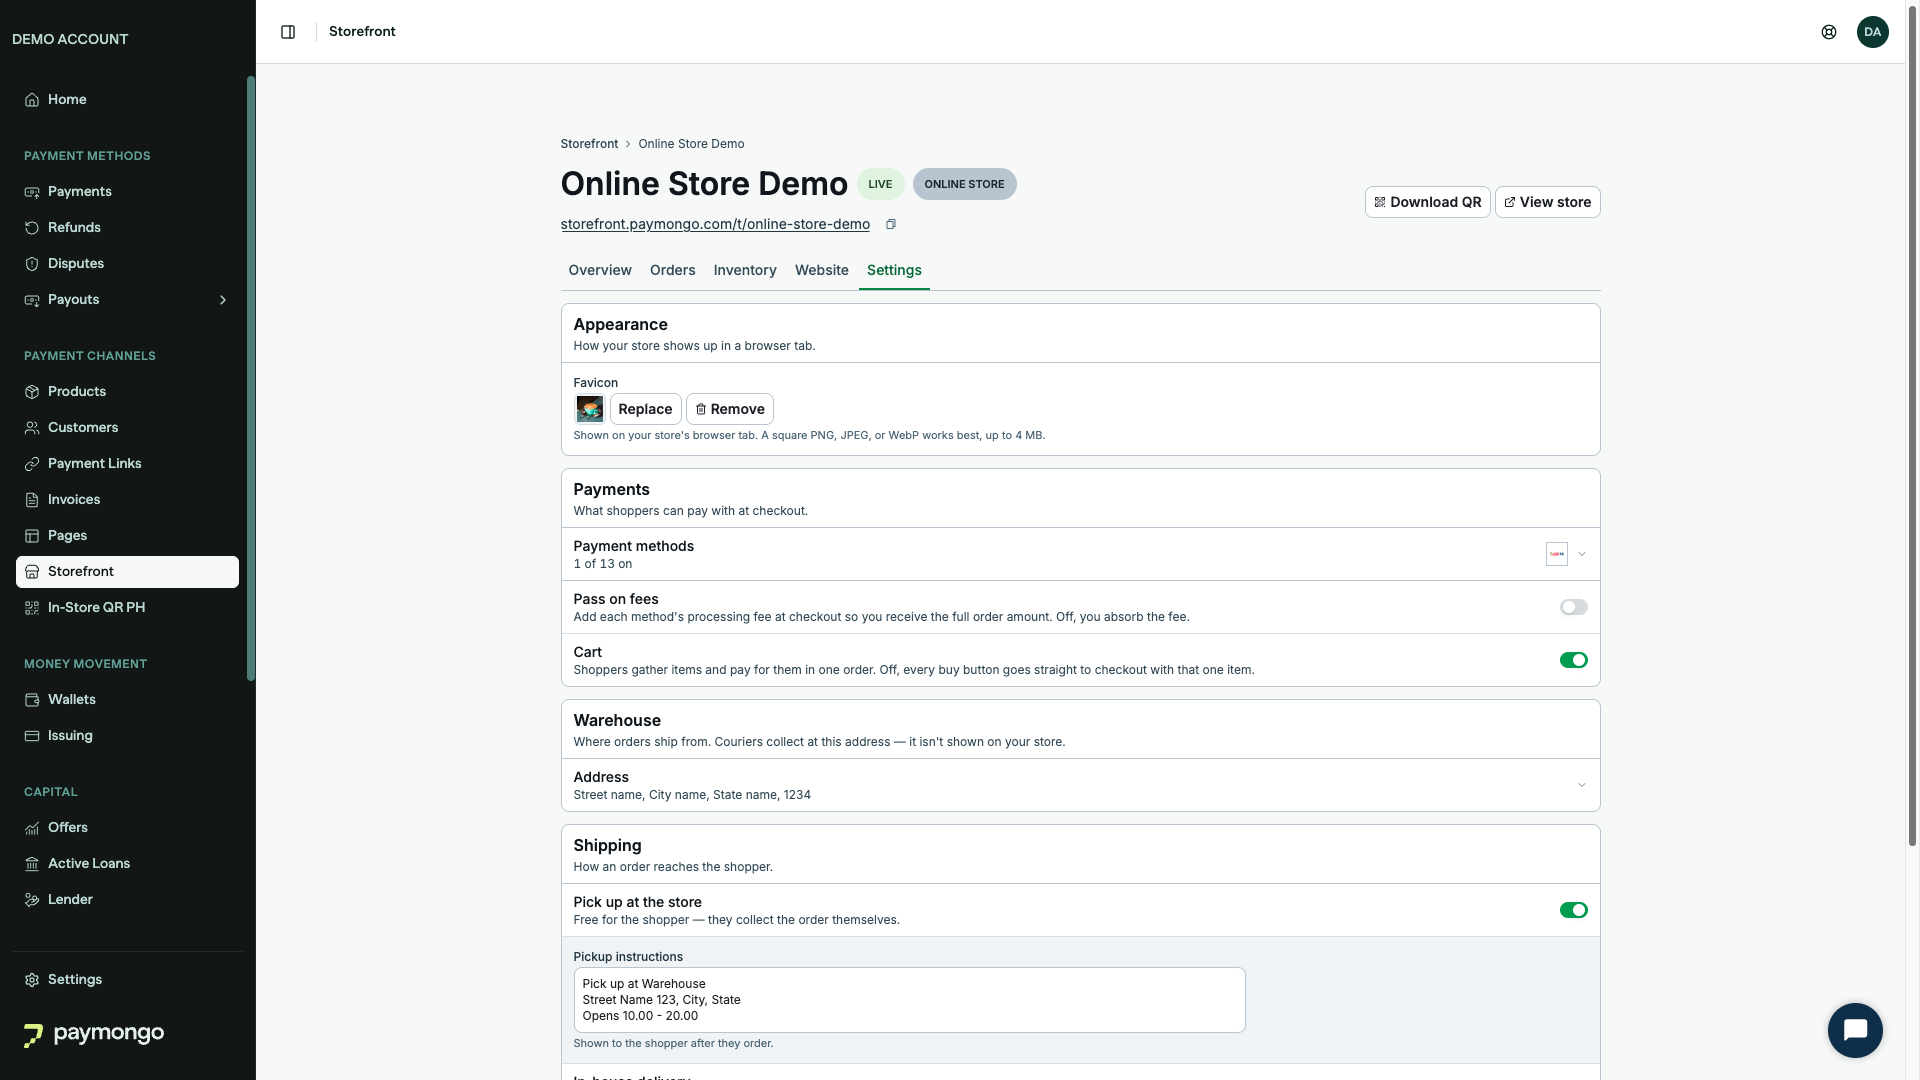
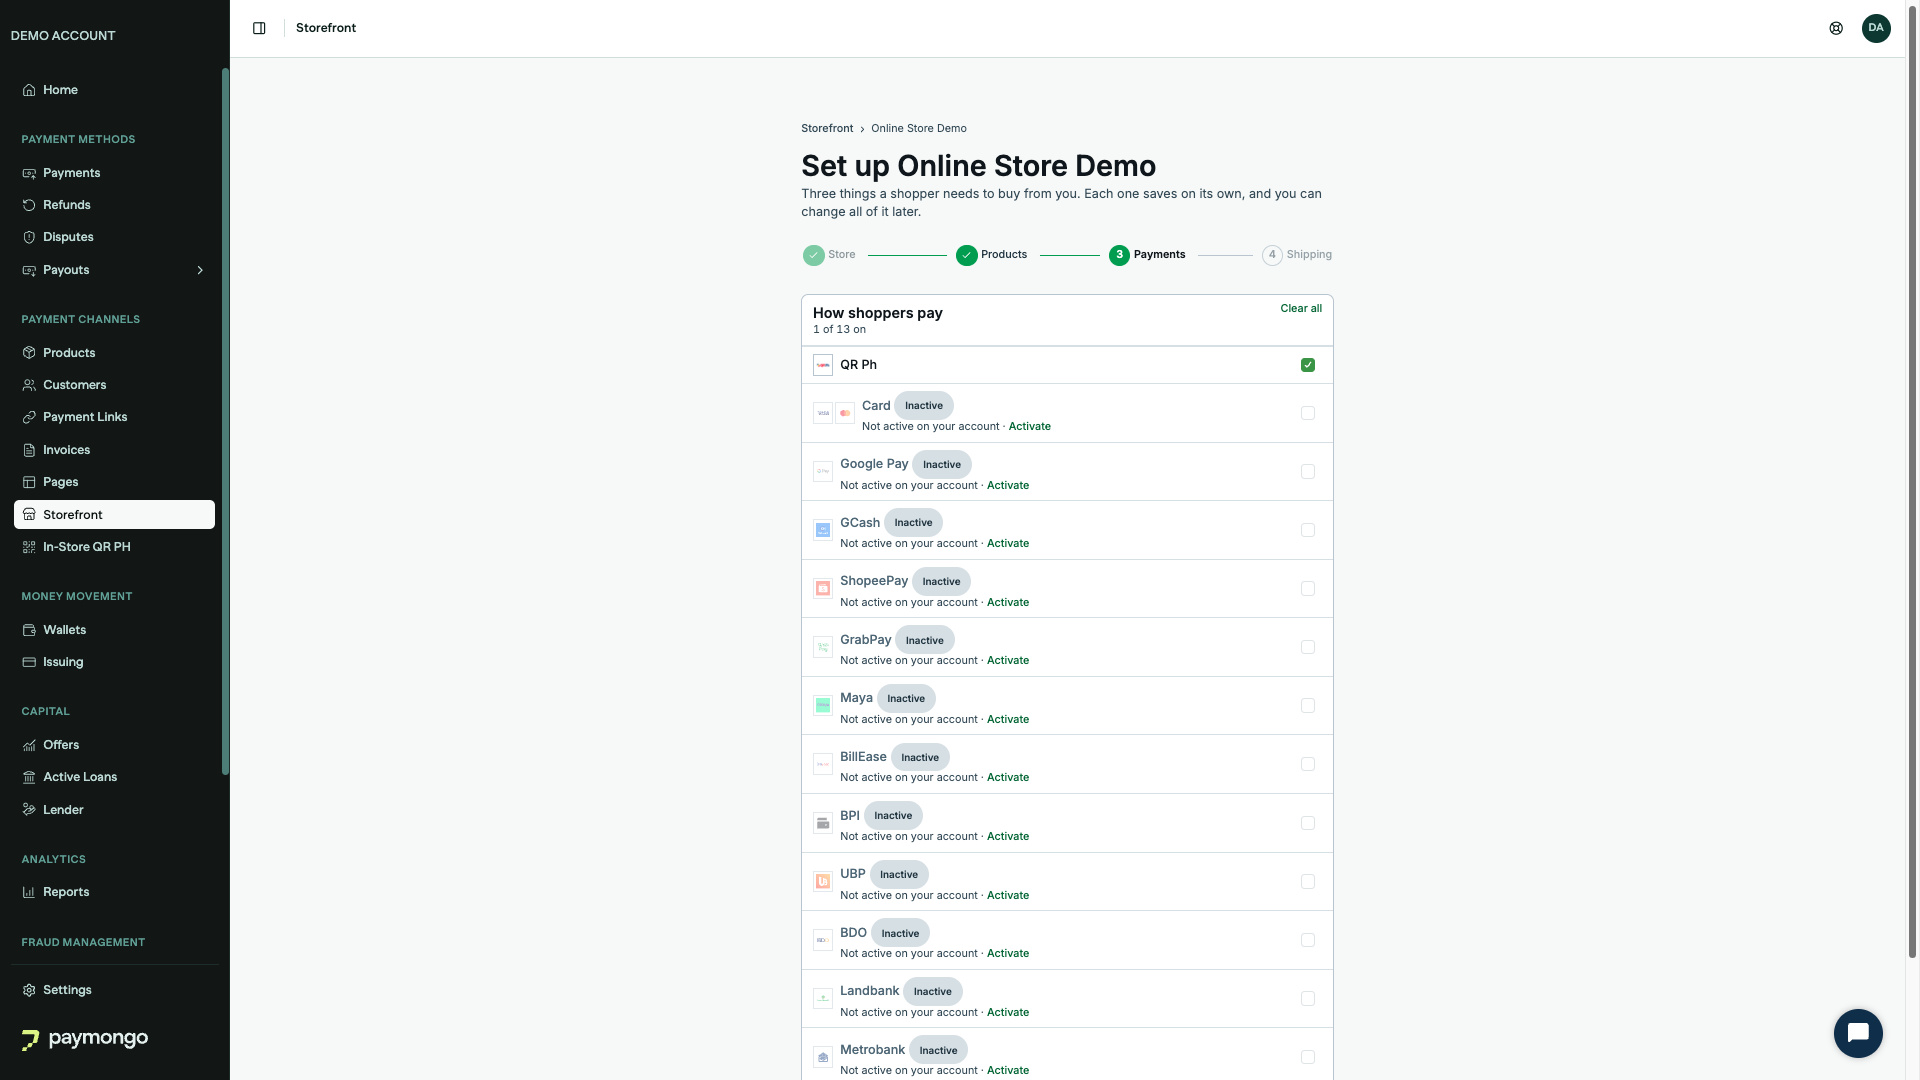
- Payment methods: choose which of your account's active payment methods appear at checkout, such as QR Ph, cards, GCash, Maya, GrabPay, ShopeePay, Google Pay, BillEase, and online banking. A method you turn on must also be active on your account.
- Pass on fees: add each method's processing fee at checkout so you receive the full order amount. Leave it off to absorb the fee.
- Cart: on, customers gather items and pay for them in one order. Off, every buy button goes straight to checkout with that one item.
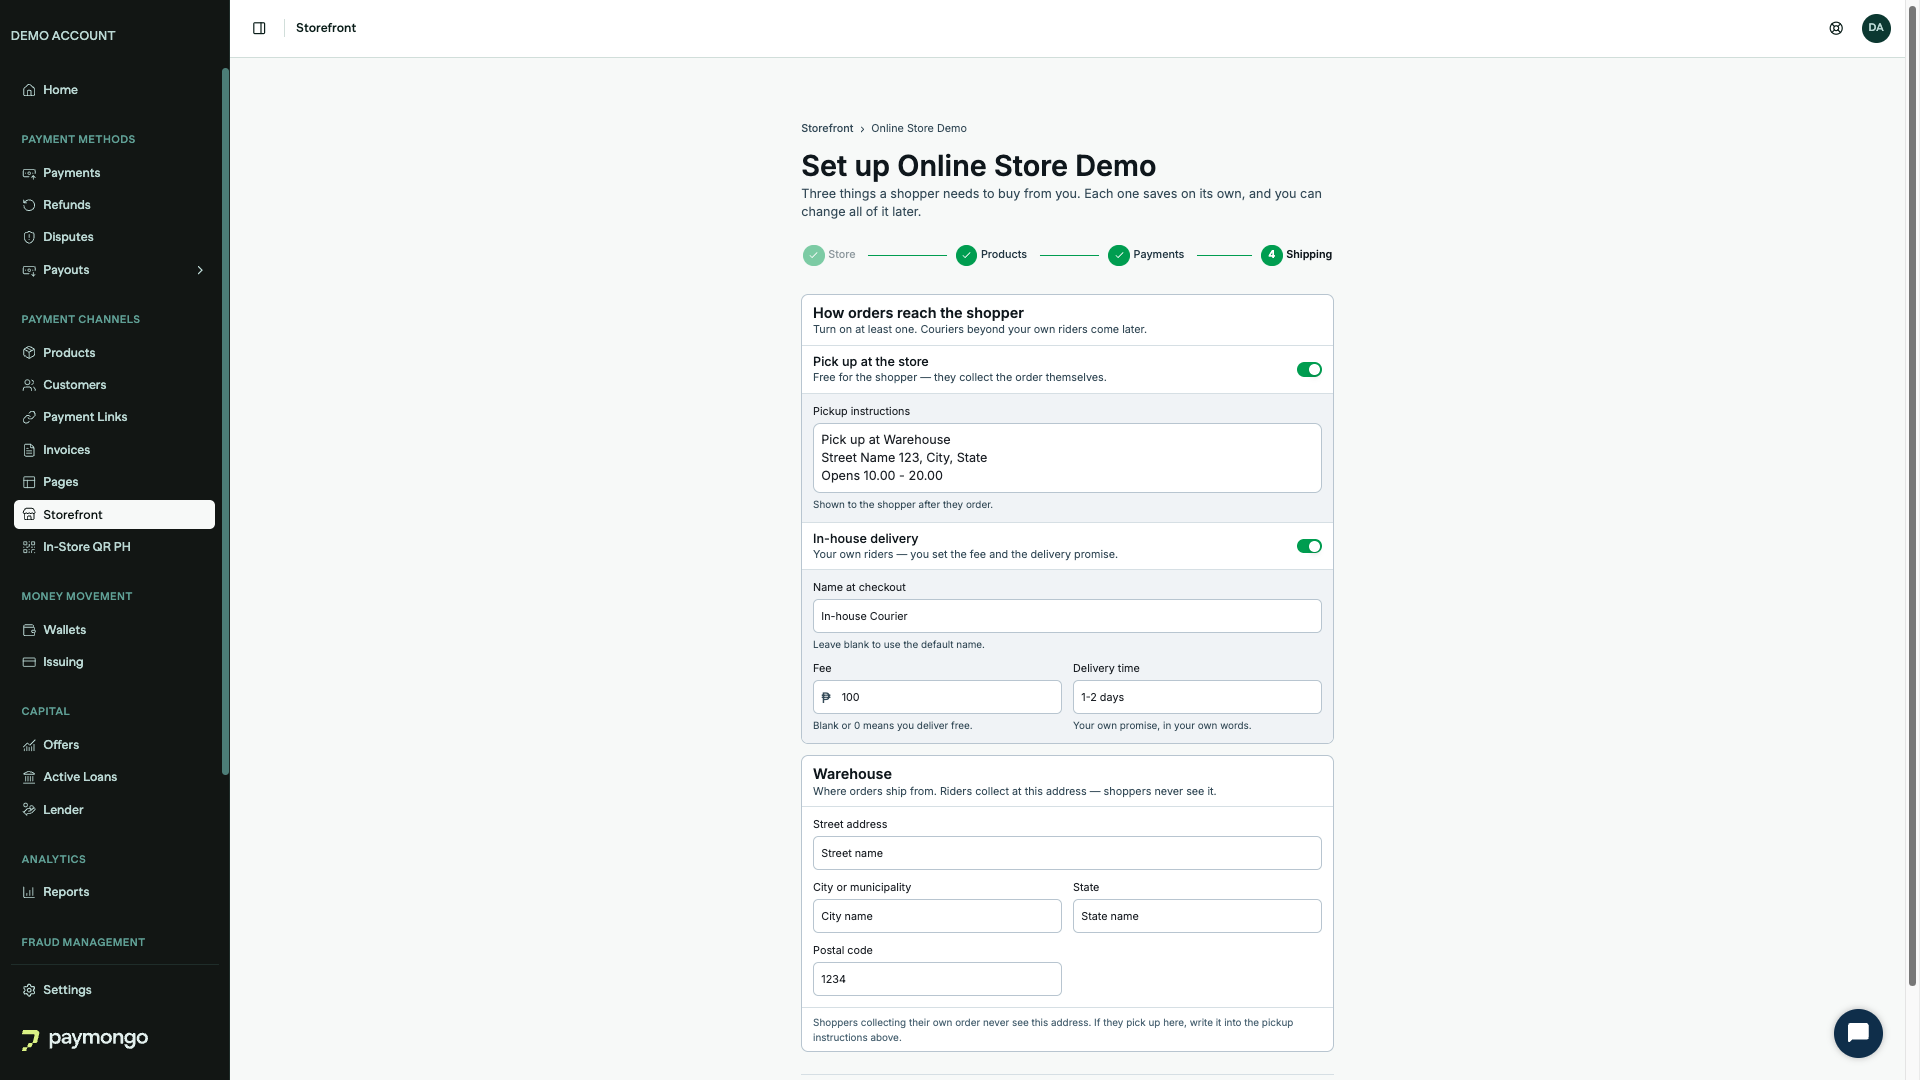
- Pickup: free for the customer. Add pickup instructions such as where to go and opening hours.
- In-house delivery: your own riders. Set the name shown at checkout, a flat fee, and a delivery time such as "1–2 days". Delivery needs a warehouse address so you know where orders ship from. The address is never shown on your store.
Settings changes reach your live store immediately without a publish.
Pricing and free trial
- Payment Pages are free, with no trial and no monthly fee. Only PayMongo's standard transaction fees apply.
- Online Stores run on a subscription. Your first Online Store starts a 30-day free trial for your account. No card is needed, and we email you before the trial ends.
- The trial covers everything: a website at your own address, orders, fulfillment, stock across warehouses, every payment method your account supports, and unlimited products.
- When the trial ends, your Online Store goes offline until your plan is set up. Your website, settings, orders, and stock are kept. Payment Pages are not affected.
Setting up your planPlans are set up by the PayMongo team for now. When your trial is ending or has ended, use the Email support button in your dashboard, or write to [email protected].
Before you start
You'll need:
- An activated PayMongo merchant account with a Closed-loop wallet, which is automatically activated once you've completed KYC. Check your wallet status at Money Movement → Wallets.
- At least one active payment method on your account. Check Payment methods in your dashboard.
- For an Online Store: your products ready to add, or the details to create them.
How to use
Create a Payment Page
-
Open Storefront in your dashboard
Sign in to your PayMongo Dashboard and open Payment Channels → Storefront. Click Create and choose Payment Page.
-
Name your page and choose its address
Enter a name. This is the heading on your page and what customers see on their receipts. Choose a web address of 3 to 63 lowercase letters, numbers, and hyphens. Your page will be at
storefront.paymongo.com/your-address. The dashboard checks that the address is free as you type. -
Compose the page
Add a description and a cover image. Choose how the amount is decided: customers decide, a fixed amount, or pick from your products. Add any questions customers must answer before paying.
-
Create the page
Click Create payment page. Your page is live right away. Return to the Page tab any time to change it. Changes go live when you save.
Create an Online Store
-
Open Storefront in your dashboard
Open Payment Channels → Storefront, click Create, and choose Online Store. If this is your first store, you'll see the free trial terms. Your 30 days start when you create the store.
-
Store: name and address
Enter your store name and web address, then click Create store and start free trial. Your store will be at
storefront.paymongo.com/your-address.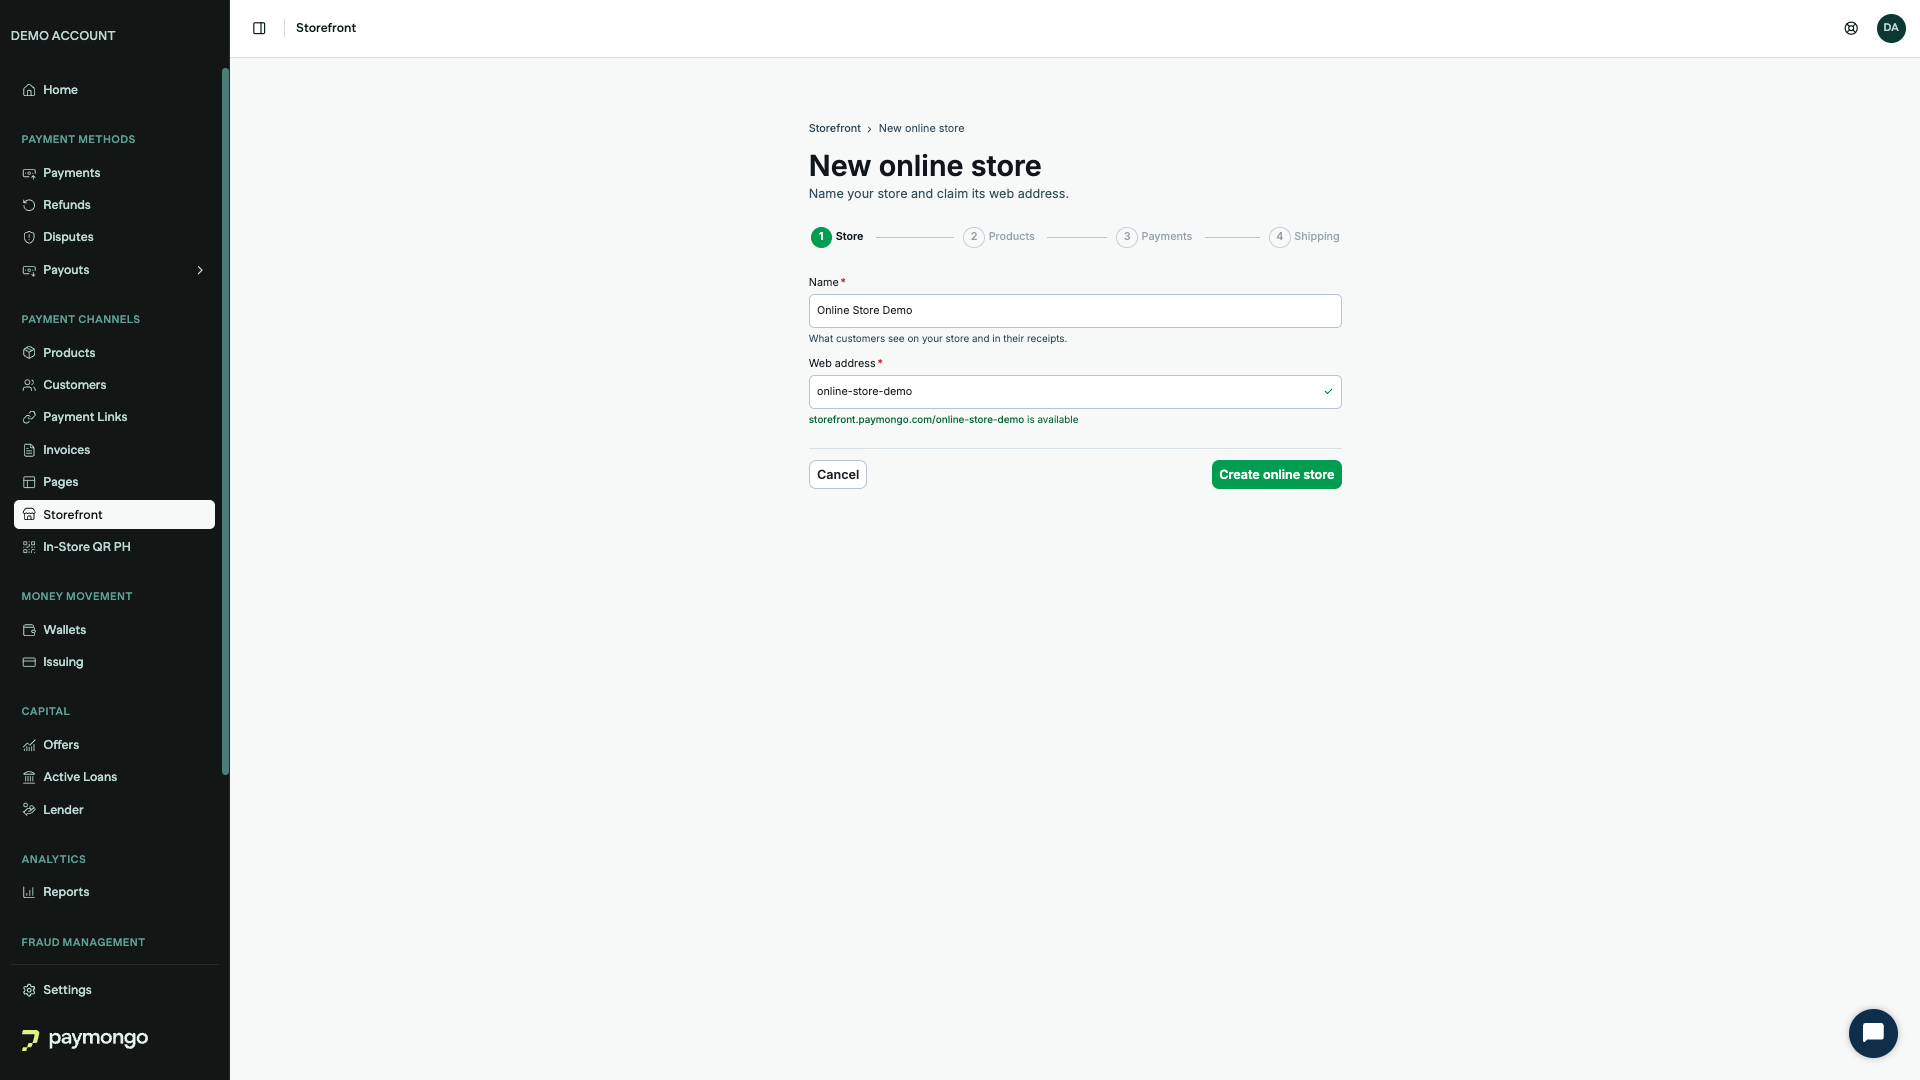
-
Products: stock your shelf
Create products or pick existing ones, and set an opening stock count for each. You can finish this later from the Inventory tab.
-
Payments: choose payment methods
Every payment method already active on your account is pre-selected. Untick any you don't want to offer.
-
Shipping: delivery and pickup
Turn on pickup, in-house delivery, or both. For delivery, enter your warehouse address, your fee, and your delivery promise.
-
Design and publish your website
You land on the Website tab. Set your theme, fill in your header and footer, add slides to your hero banner, and arrange your home page. Use the preview to check desktop and mobile. When you're happy, click Publish. Your store is live at its address.
Test mode
Switch your dashboard to test mode to build and try a page or store without real payments. Test storefronts live at storefront.paymongo.com/t/your-address, are always free, and never use your trial. A test address is not reserved in live mode, so you can reuse it when you go live.
Share your page or store
Every storefront has a permanent address and a QR code. From the storefront's header in the dashboard, use Copy to copy the address or Download QR to get a printable code.
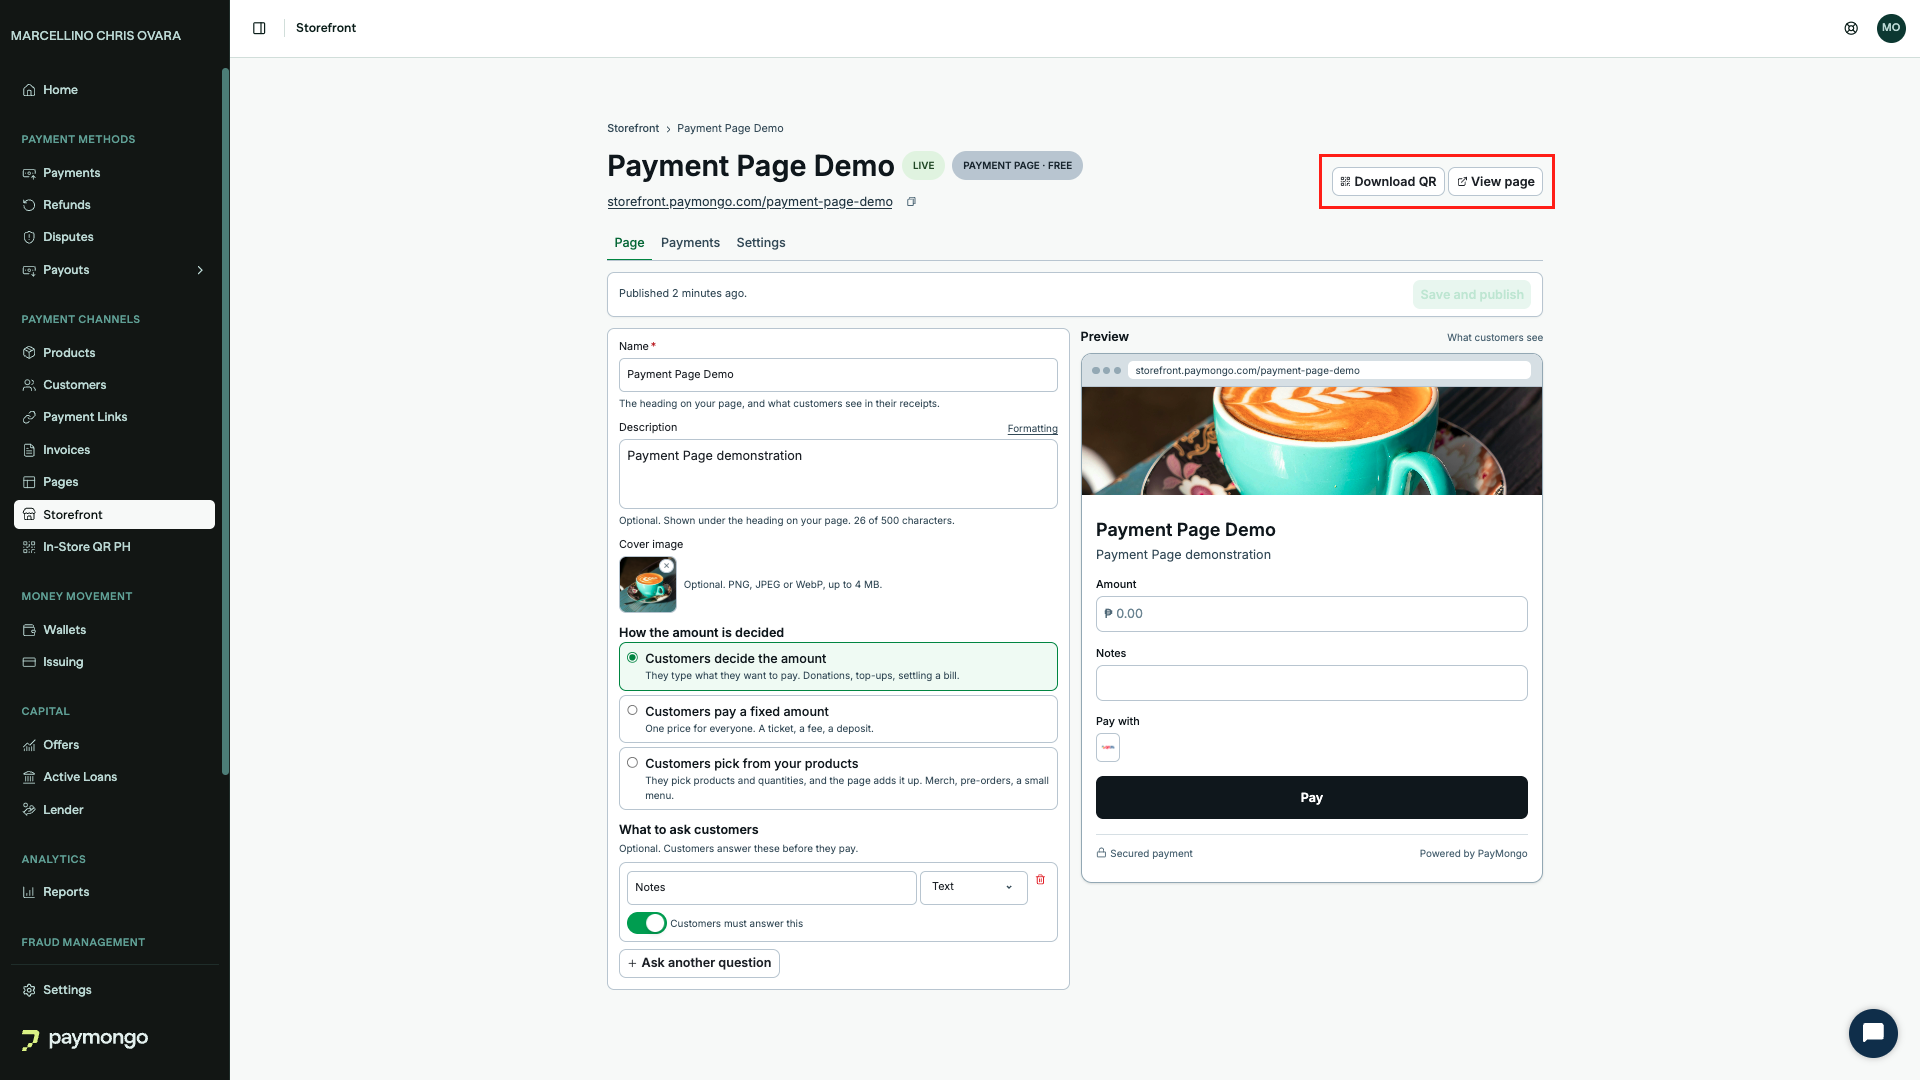
Share them on Facebook, Instagram, Messenger, SMS, email, or printed materials. Because the address doesn't change, you can keep sharing the same link.
Track payments and orders
- Payment Pages: open the page's Payments tab to see each payment with its reference, payment ID, the customer's answers to your questions, the amount, fee, and paid time. Every payment also appears under Payments → All Payments.
- Online Stores: open the store's Orders tab to see and fulfill orders. Each order links to its payments in Payments → All Payments.
- Customers receive an email receipt after every successful payment. Customers on an Online Store also see an order confirmation with their order number.
Moving from Pages to Storefront
Your existing Pages are being moved into Storefront as Payment Pages. Nothing changes about what they do, and they stay free forever.
- By 24 September 2026, we move every Page for you. There is nothing for you to do. Moved pages appear under Payment Channels → Storefront with the same title, description, image, amount settings, and custom questions.
- Each moved page gets a new address at
storefront.paymongo.com/your-address. The dashboard shows the old address next to the new one. - Your current links and QR codes keep working until 23 November 2026. Update them before then. Download QR in the dashboard gives you the new code.
- After 23 November 2026, the old
pages.paymongo.comaddresses stop answering. - Create new Payment Pages from Storefront from now on.
Coming soon
We're building on the new Storefront. These are on our list, with no release dates yet:
- Custom domains
- Shipping integration: courier rates and booking at checkout, alongside your own delivery.
- AI prompting: describe your store and let Storefront draft your pages, theme, and copy for you to refine in the editor.
- Discounts and promo codes
- Refunds from the Orders tab
- Order export
- Merchant notifications: an SMS or email to you when an order is paid.
- SEO settings: page titles, descriptions, and social sharing images.
Tell us which of these you need, and what else is missing, in the Storefront survey. Your answers decide what we build next.
Legacy Storefront
If you created a storefront with the previous, prompt-generated Storefront, it appears under Legacy Storefront in your Storefront list. It keeps working at its current address, but new features only arrive on Payment Pages and Online Stores. To use the website editor, order management, and inventory management, create a new Online Store.
FAQ
Can I turn a Payment Page into an Online Store?
No. The kind is fixed when you create a storefront. Create an Online Store and reuse your products.
Can I use my own domain?
Not yet. Storefronts are served at storefront.paymongo.com/your-address. Custom domains are on our Coming soon list.
Does my Online Store need a trial in test mode?
No. Test-mode stores are always free and don't use your trial.
What happens to my Online Store when the trial ends?
Shoppers see a closed page, and the website and settings become view-only. Your orders and stock still work, and your draft is kept. Email support to set up your plan and go back online.
Do customers need an account to buy?
No. Customers check out as guests with their name, email, and mobile number. Payment Pages don't ask for any of these on the page; PayMongo's checkout collects them.
Can I offer discounts or promo codes?
Not yet. Discounts are on our Coming soon list. Tell us you need them in the Storefront survey.
Updated 8 days ago